How to Recover Deleted Files on Your Mac: Top 7 Solutions
Table of Contents
Accidentally deleting files on a Mac is a common occurrence that can happen for many different reasons. Fortunately, there are several ways to retrieve your lost data, whether it’s documents, photos, videos, or spreadsheets. In this article, we’ll show you the top 7 solutions for recovering deleted files on your Mac.
How to Recover Deleted Files on Mac
If you’ve recently realized that you need to know how to retrieve deleted files on macOS, the first step is to take a deep breath. In most cases, deleted files can be recovered. Maybe they’re still in the Trash folder, securely backed up in the cloud or some local storage device, or recoverable using specialized third-party software.
Whatever the case may be, this guide will walk you through several effective methods to retrieve your data. Here’s their quick summary:
| Method | Best Use Case | Cost |
| Check Trash Folder | Recently deleted files | Free |
| Use a Terminal command | Recovery from hidden trash folders | Free |
| Use Undo Options | Immediately after deletion | Free |
| Time Machine Backups | Recovering previous versions of files | Free but requires enabled Time Machine |
| Other Backups (iCloud, Third-Party) | Recovering files from backups | Depends on the solution |
| Third-Party Software (Disk Drill, PhotoRec) | Permanent deletion, various data loss scenarios | Depends on the solution |
| Data Recovery Services | File recovery from severely damaged drives | Expensive |
1. Recover your deleted files from the Trash folder
The first stop on your journey to recover deleted files on Mac is the Trash can in your Dock. It sits to the bottom right in the current macOS version, but it might be in other places if you’re using older software.
- Use a long click on the trash can icon to pull up its menu.
- Select the Open option that appears.
- This process brings up a Finder window that lets you locate and restore your missing files.

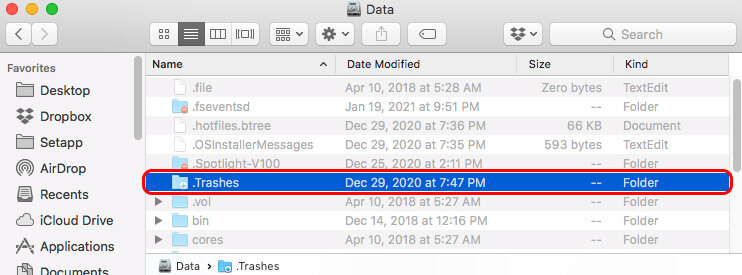
That process works for your Mac’s internal drive. If you have an external HDD or SSD, including USB flash drives, the Trash folder is different.
Each drive has a different one you must access, and macOS keeps it hidden by default.
On macOS Sierra (or later), you can use the SHIFT+COMMAND+PERIOD key combination to see your hidden files. On older operating systems, you’ll need to use Mac Terminal.
Once you’re into the .Trashes folder, you can restore the deleted files.
2. Use Mac Terminal to recover deleted files on Mac
If you have older macOS versions on your computer, you’ll need to use Mac Terminal to access your hidden trash folders. This method can also work if your system isn’t displaying the primary Trash folder for some reason.
- You’ll need to navigate to the Terminal icon. You can do this easily through the Spotlight feature or go through Launchpad and the Utility icon set.
- Once you launch mac Terminal, you’ll need to copy and paste this command line into the prompt.
defaults write com.apple.finder AppleShowAllFiles TRUE
killall Finder

- This command should enable you to see and interact the .Trashes folder.
To recover deleted files from the now visible .Trashes folder, you need to:
- Navigate to the .Trashes folder by entering the following command: cd /Volumes/[Volume Name]/.Trashes
- List all files inside the .Trashes folder: ls
- Move files from .Trashes back to a specific directory: mv [file name] ~/Desktop/
When you are finished with your file recovery, type the following two commands into Mac Terminal to hide the folders once again:
defaults write com.apple.finder AppleShowAllFiles FALSE and then killall Finder
3. Use Undo options to retrieve deleted files on macOS
Apple offers a helpful Undo feature for many commands and actions you can take within macOS and your various apps and software choices.
If you realized that you just moved a file to the Trash folder, you could Undo that action.
- Open a Finder window.
- Select the “Edit” option from the top menu bar.
- The first choice will let you “Undo Move [File Name].”
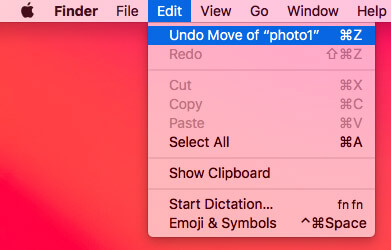
You can also use the COMMAND+Z keyboard shortcut on Mac computers to initiate the Undo command.
Even if you’ve moved a few other files to the Trash folder after the one you want to recover, this methodology still works. You’ll be restoring access to the other data first until you reach the specific item you wish to recover.
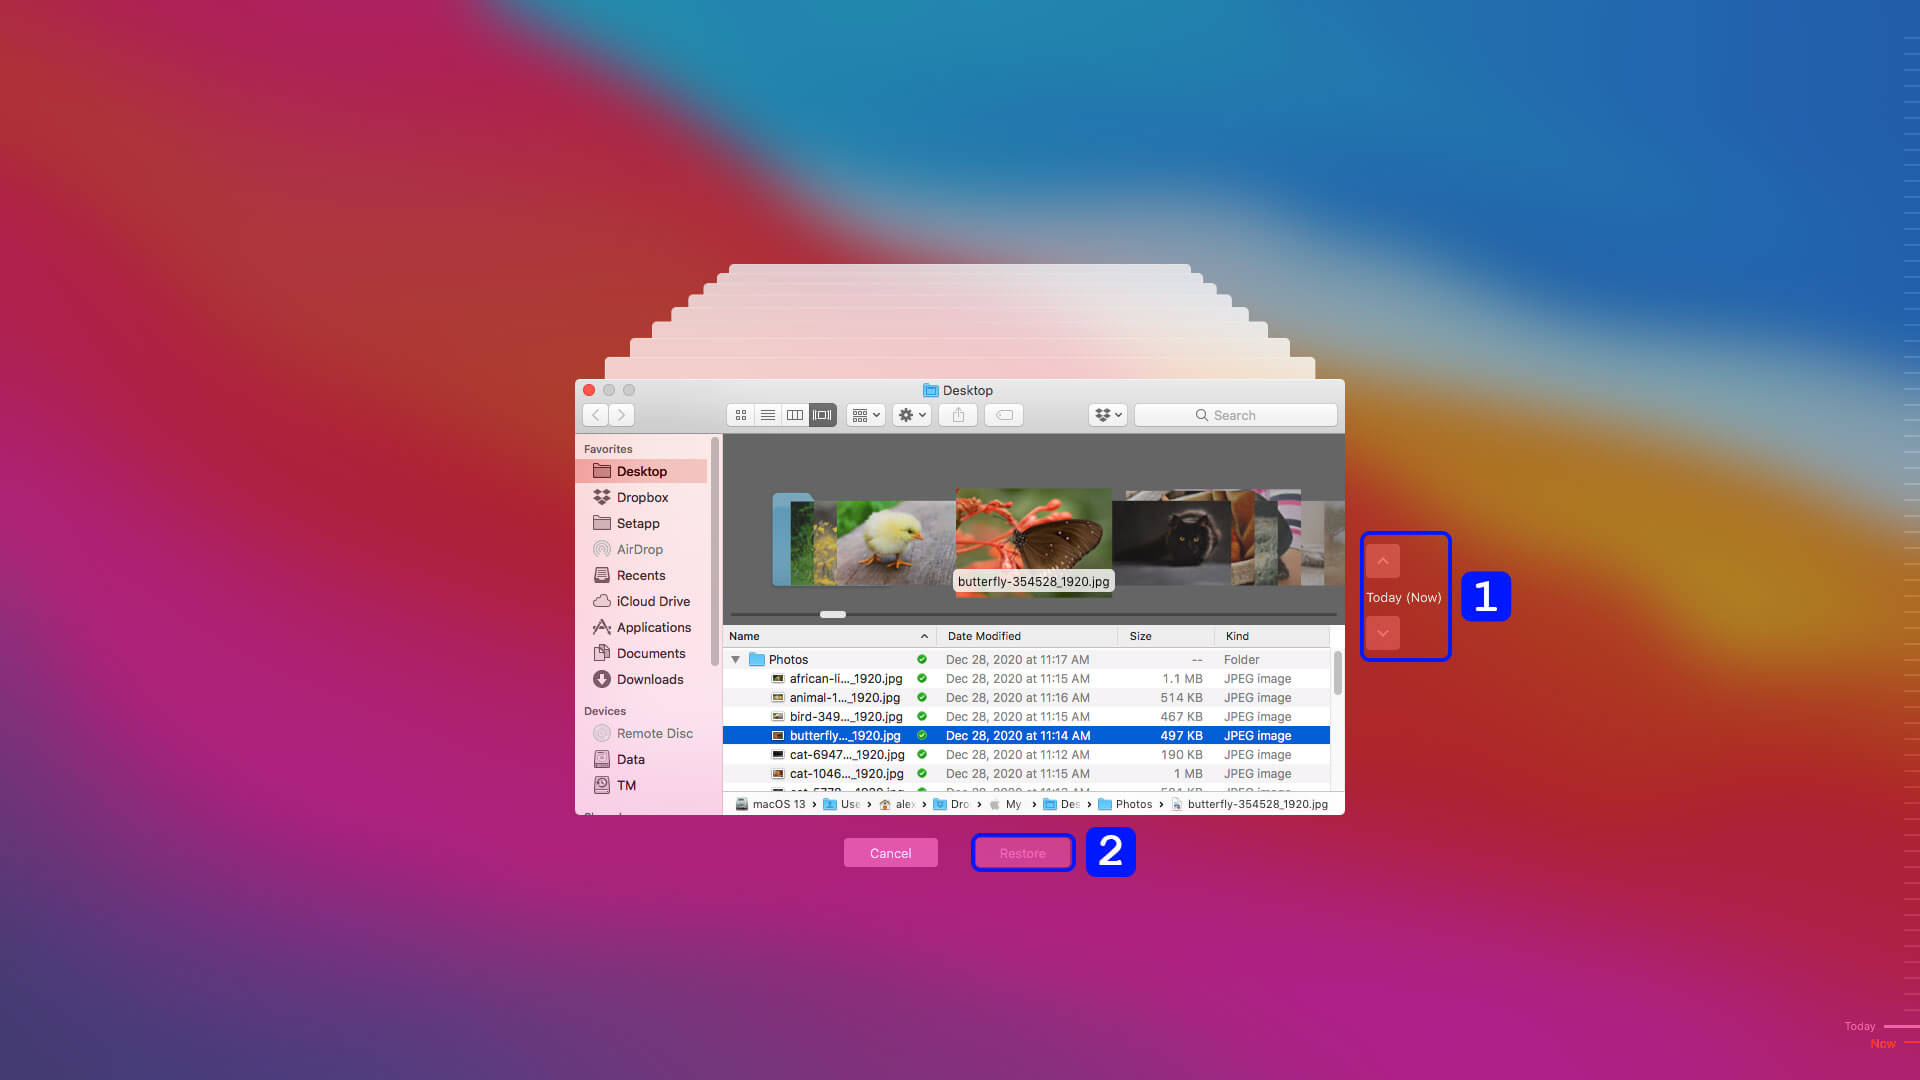
4. Time Machine backups can restore access to a previous file version
Time Machine is a built-in backup feature on Macs that automatically creates and maintains backups of your files. If you have previously enabled it on your Mac, then you can use it to restore access to deleted files (even to a specific version of a deleted file). Just know that, by default, Time Machine doesn’t back up files on external drives or network volumes, so if the deleted file was stored in one of those locations, it won’t help you.
- You can find Time Machine by using the Spotlight feature on your Mac. It’s also available through Launchpad and your Utilities.
- Once Time Machine opens, you’ll need to click the folder where your deleted files used to reside.
- Next, click the arrow to the right of your window to scroll through your backup disk images until the information you want to recover appears.
- Use the Command button on your Magic Keyboard or laptop to select all of your targeted files. Click the “Restore” button to save them back to your Mac.
5. Use other backups to restore file access
If you don’t have Time Machine backups or they don’t contain the files you need, you can try using other backup services to restore your deleted files.
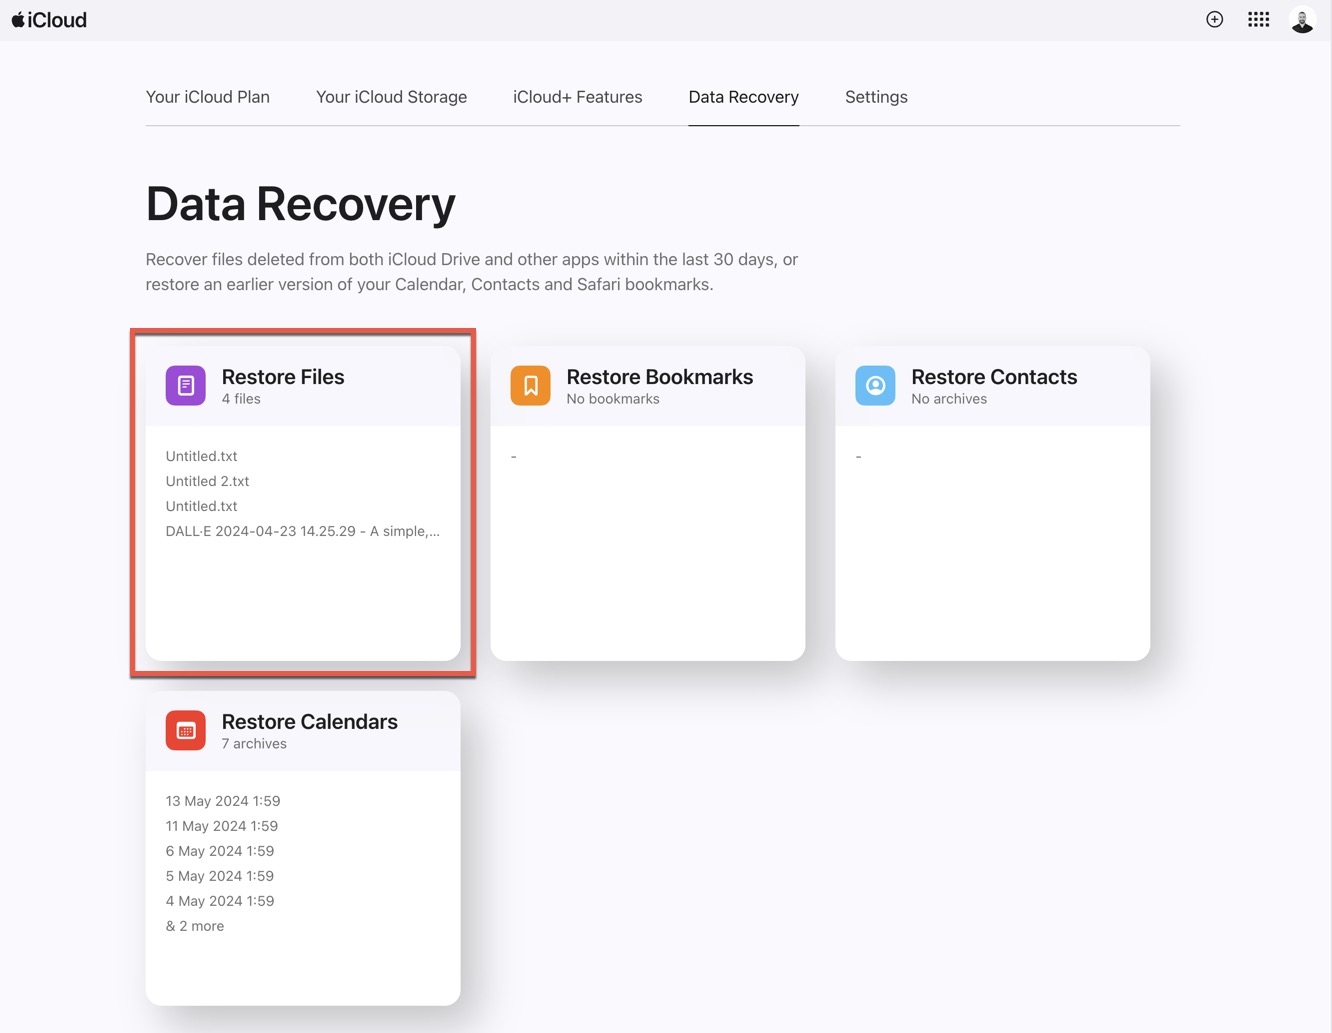
iCloud is a popular backup service for Mac users. It provides 5GB of free storage and uses your Apple ID for access. You can easily recover deleted files from iCloud by following these steps:
- Go to iCloud.com and sign in with your Apple ID.
- Click your profile picture in the top-right corner and select iCloud Settings.
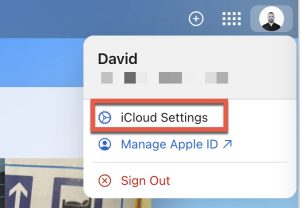
- Navigate to the Dara Recovery tab.
- Click on Restore Files and choose the files you want to recover.

Other backup services like Google Drive, OneDrive, and Dropbox can also be used to restore deleted files. These services typically provide a web interface or a desktop app that allows you to access your backups and restore files.
It’s also a good idea to check any manually created local backups you may have. These backups could be on an external hard drive, a USB flash drive, or a network-attached storage (NAS) device. You can use the Finder app to browse these backups and restore files.
6. Use third-party software solutions to recover deleted files
If your files are impossible to recover from Trash and are not included in any of your backups, then you should consider using third-party data recovery software. Such software can scan your Mac’s hard drive for any trace of the deleted files and potentially recover them if they haven’t been overwritten by new data.
We recommend Disk Drill for Mac because it boasts a user-friendly interface and powerful recovery capabilities. More specifically, it supports all Apple file systems (as well as those used by Windows and Linux), and its smart algorithms can effectively recover all commonly used file formats right out of the box.
Here are the steps to use Disk Drill:
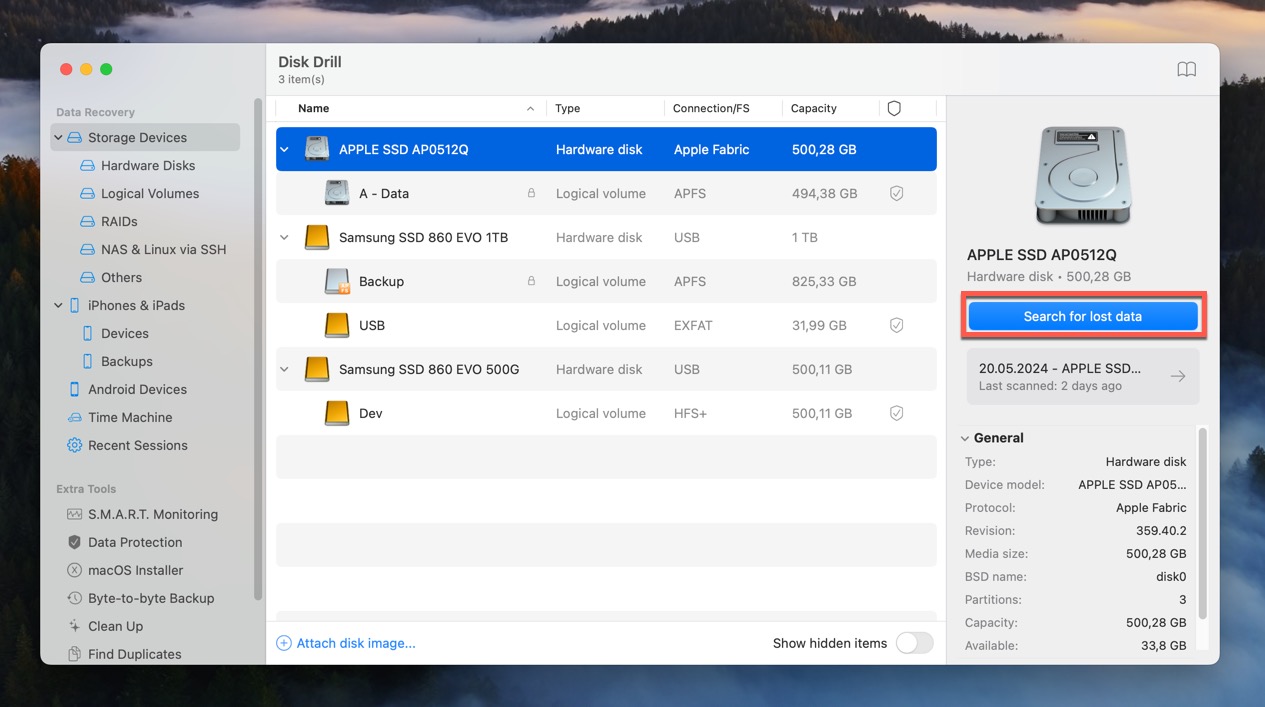
- Download and install Disk Drill for Mac from the official website.
- Launch Disk Drill and select the drive or partition where you lost your files.
- Click the Search for lost data button to start the scanning process. Disk Drill will then go through its recovery algorithms to find and display a list of recoverable files.
- Preview the files to make sure they are the ones you want to recover.
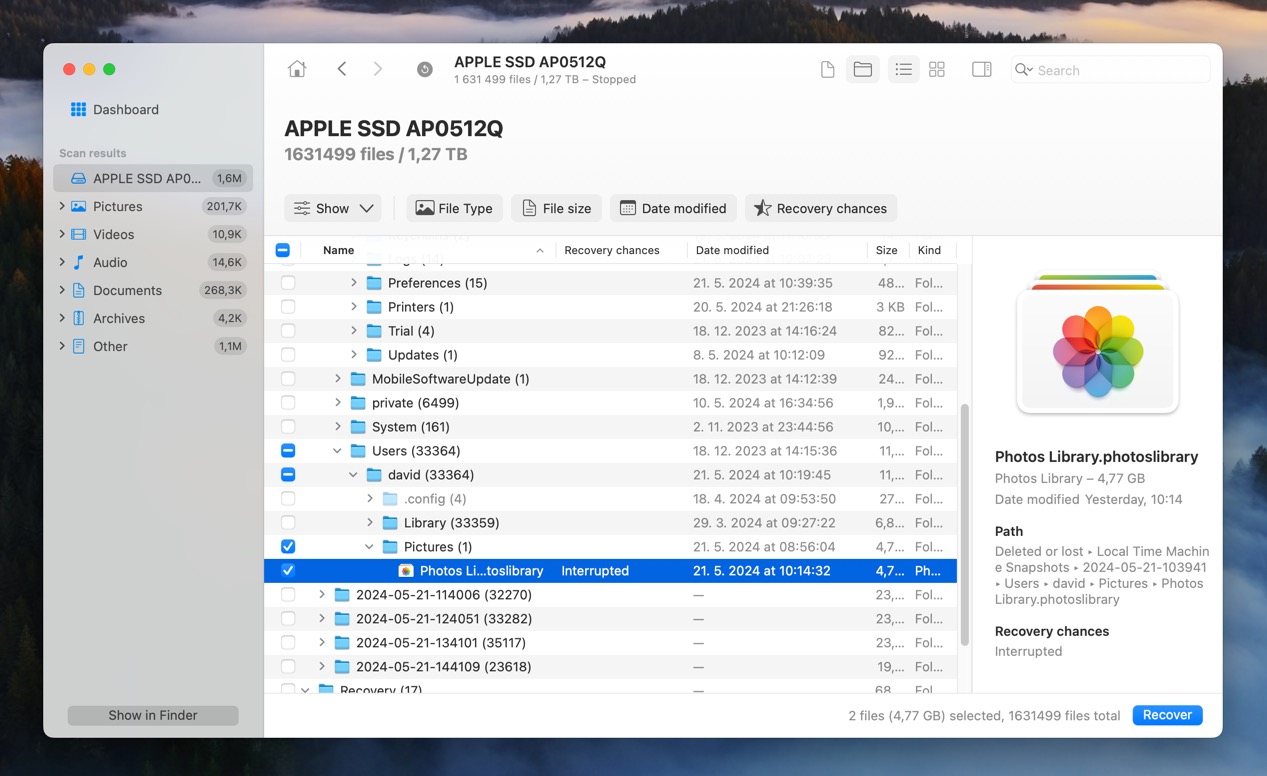
- Select the files you want to recover and click the Recover button.
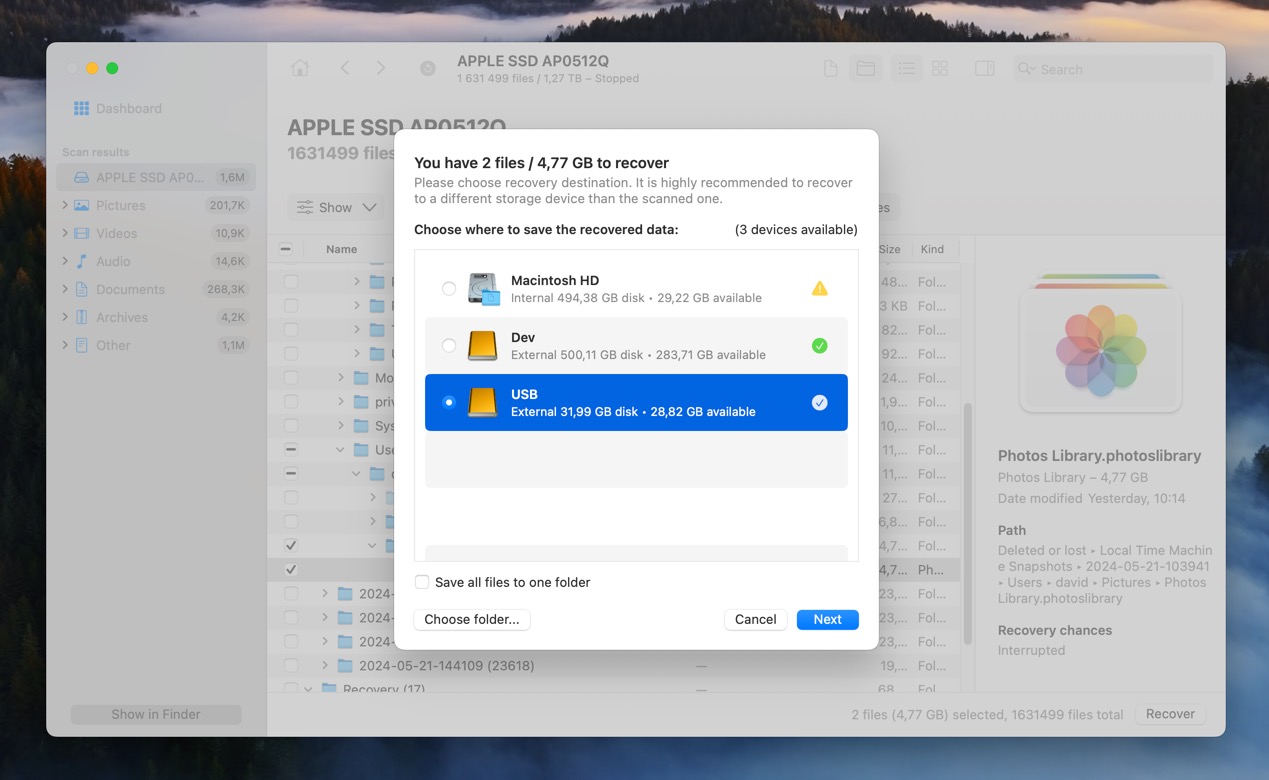
- Choose a safe location on your Mac or an external drive to save the recovered files.


The free version of Disk Drill can preview recoverable files, but you’ll need to upgrade to the Pro version to actually recover them.
Besides Disk Drill, you can also try PhotoRec for Mac. With its help, you can find and recover hundreds of audio, video, photo, and document file formats based on their signatures (unlike Disk Drill, the tool doesn’t support file system-based recovery). Best of all, PhotoRec for Mac is completely free and open source. Its biggest downside is that it doesn’t have a graphical user interface.
If you’re dealing with the loss of an entire partition, then you should also take a look at PhotoRec’s sister application, TestDisk. Developed by the same person, TestDisk is a powerful tool for recovering lost partitions and rebuilding damaged partition tables. We recommend it for recovering data lost from external storage devices during failed partitioning attempts on Mac.
7. Use data recovery services
If none of the previous recovery options have worked to retrieve your missing files on Mac, you can consider using data recovery services. This method involves shipping your affected drive to a laboratory or skilled specialist who will attempt to physically recover the lost data.
Here are the steps to follow:
- Research and choose a reputable data recovery service. Look for reviews, certifications, and experience in dealing with your type of data loss.
- Follow the service’s instructions for packaging and shipping your affected drive. Be sure to include any necessary documentation or contact information.
- Once the service receives your drive, they will perform a media diagnostic process to determine the chances of recovery. This analysis includes the current state of the drive, its problem, and the prospects for a successful outcome.
- The service will provide you with an estimate of the recovery cost and time. Be sure to ask any questions and clarify expectations before giving your approval to proceed.
- If you approve the estimate, experienced technicians will begin accessing your drive in a clean room environment to ensure the recovery results happen as expected.
- The service will provide you with the recovered data, usually on a new drive or via a secure online transfer.
Data recovery services can be expensive, with prices ranging from $300 to $500 or more, depending on the extent of the damage. However, it’s usually the only option when physical damage is involved. If the lost data is highly valuable to you, such as critical business documents, irreplaceable personal photos, or essential research data, the cost of recovery can be a worthwhile investment.
How to Protect Your Files on Mac
The best way to protect your files on Mac is to keep regular backups. You have two macOS options that might not cost anything to accomplish this task.
Time Machine is a built-in macOS utility that handles file backups in the background automatically. You’ll want an external HDD or SSD to control the information, but it can ensure that you get the protection you need against accidental deletion.
Another option for protecting your files on Mac is to take advantage of your iCloud resources. Apple provides users with 5 GB of free storage, which means you can transfer files from external drives, SD cards, USB flash drives, and your internal storage up to that limit for no cost.
Apple lets you store documents, PowerPoint presentations, PDFs, GIFs, image files, CAD program files, music composition files, and much more. If you can save it to a Mac and sent it to iCloud, it’ll get safely stored there.

If you need more storage, you can get an additional 50 GB for only $0.99 per month.
Third-party backup solutions are also available. Companies like Disk Drill or CrashPlan provide complete backup solutions through your ISP connection to ensure you experience minimal data loss.
You can also take these steps to prevent having your files accidentally deleted in the future.
- Password-protect your critical folders on Mac so that you get a two-factor authorization method whenever moving items from that area to the Trash.
- Wait until macOS notifies you that it is safe for a USB flash drive or external HDD/SSD to get removed after ejection.
- Turn off the automatic deletion feature that takes files out of the Trash folder after 30 days.
- Encrypt your disk using FileVault.
A Final Thought: How to Retrieve Deleted Files on Mac
File recovery on Mac computers only takes a couple of minutes to complete in most situations. Even if you’ve moved items out of your Trash folder, third-party recovery tools like Disk Drill can scan and locate this information to restore it.
The only way you cannot access a deleted file is if the storage sector was written over, effectively terminating access to the data because different information is now saved in its place.
That’s why it is essential to stop using your Mac immediately if your missing files are anywhere other than the Trash folder.
FAQ: Mac Files Recovery
Yes, it is possible to recover deleted files on Mac, especially if they are still in the Trash folder. If you have a backup solution from Time Machine or iCloud, you can restore access to the deleted files quickly and easily. If not, then data recovery software like Disk Drill can be used to find and recover permanently deleted files.
You have three main options to recover permanently deleted files from your Mac:
- Use data recovery software, such as Disk Drill for Mac, to scan your drive and attempt to locate and recover the missing files.
- Retrieve the missing files from a previously created backup.
- Pay a professional data recovery service to recover the files for you.
Yes, it is possible to recover erased files on Mac computers, depending on the method of erasure and the condition of the drive. Here are some methods you can try:
- Restore the file from the Trash folder, if it was recently deleted.
- Use Time Machine or some other backup solution.
- Use data recovery software, such as Disk Drill for Mac, to scan the drive and attempt to locate and recover the missing files.
- Use a professional data recovery service to physically access and recover the missing files, if necessary.
The only way to recover permanently deleted files from a Mac without software is if you have a backup of the files. This can be through Time Machine, iCloud, or an external hard drive. If you do not have a backup, then it is highly unlikely that you will be able to recover the files without using data recovery software.