How to Recover Data from a Seagate Drive on Mac
Table of Contents
If you’ve suffered data loss with a Seagate hard drive, you may be able to recover some of the information you’ve lost with the help of your Mac. There are several options available for Seagate file recovery for Mac, and some of them don’t require any advanced skills to use.
Keep in mind that your success will involve some luck as well. If your files were accidentally deleted, for example, your recovery chances will depend on how much the drive has been used since the incident occurred. That’s why it’s recommended to immediately unplug your hard drive in an event like this. Many people are not aware of this and will continue using their drive, unknowingly overwriting data that could have otherwise been saved.
Common Reasons for Data Loss on a Seagate Hard Drive
Various situations can lead to data loss from a Seagate hard drive. Each of those situations requires a different approach. Make sure to familiarize yourself with your exact problem before attempting any of the recovery methods listed below.
| Problem | Solution |
| Drive doesn’t appear | Fix 1: Use Seagate hard drive recovery software Fix 3: Use Disk Utility |
| Drive is not formatted correctly | Fix 3: Use Disk Utility |
| Drive is corrupted | Fix 1: Use Seagate hard drive recovery software Fix 2: Use Seagate’s recovery service |
How to Recover Files from a Seagate Hard Drive on a Mac
Knowing how to recover a Seagate external drive on a Mac comes down to understanding the tools you have available, and identifying the appropriate situation to use each one. You may be able to use Seagate file recovery software for Mac. If that doesn’t work out, you should consider sending your drive to a specialized data recovery center. When it comes to Seagate, the company actually provides its own service for this.
Fix #1: Using Seagate Hard Drive Recovery Software
Hard drive recovery software can help make this process easy. There are various solutions on the modern market. If you’re not experienced in this area and don’t know where to even begin, we recommend using Disk Drill. To recover your Seagate hard drive using Disk Drill, follow these steps:
- Download and install Disk Drill
- Connect your Seagate hard drive to your Mac
- Launch Disk Drill
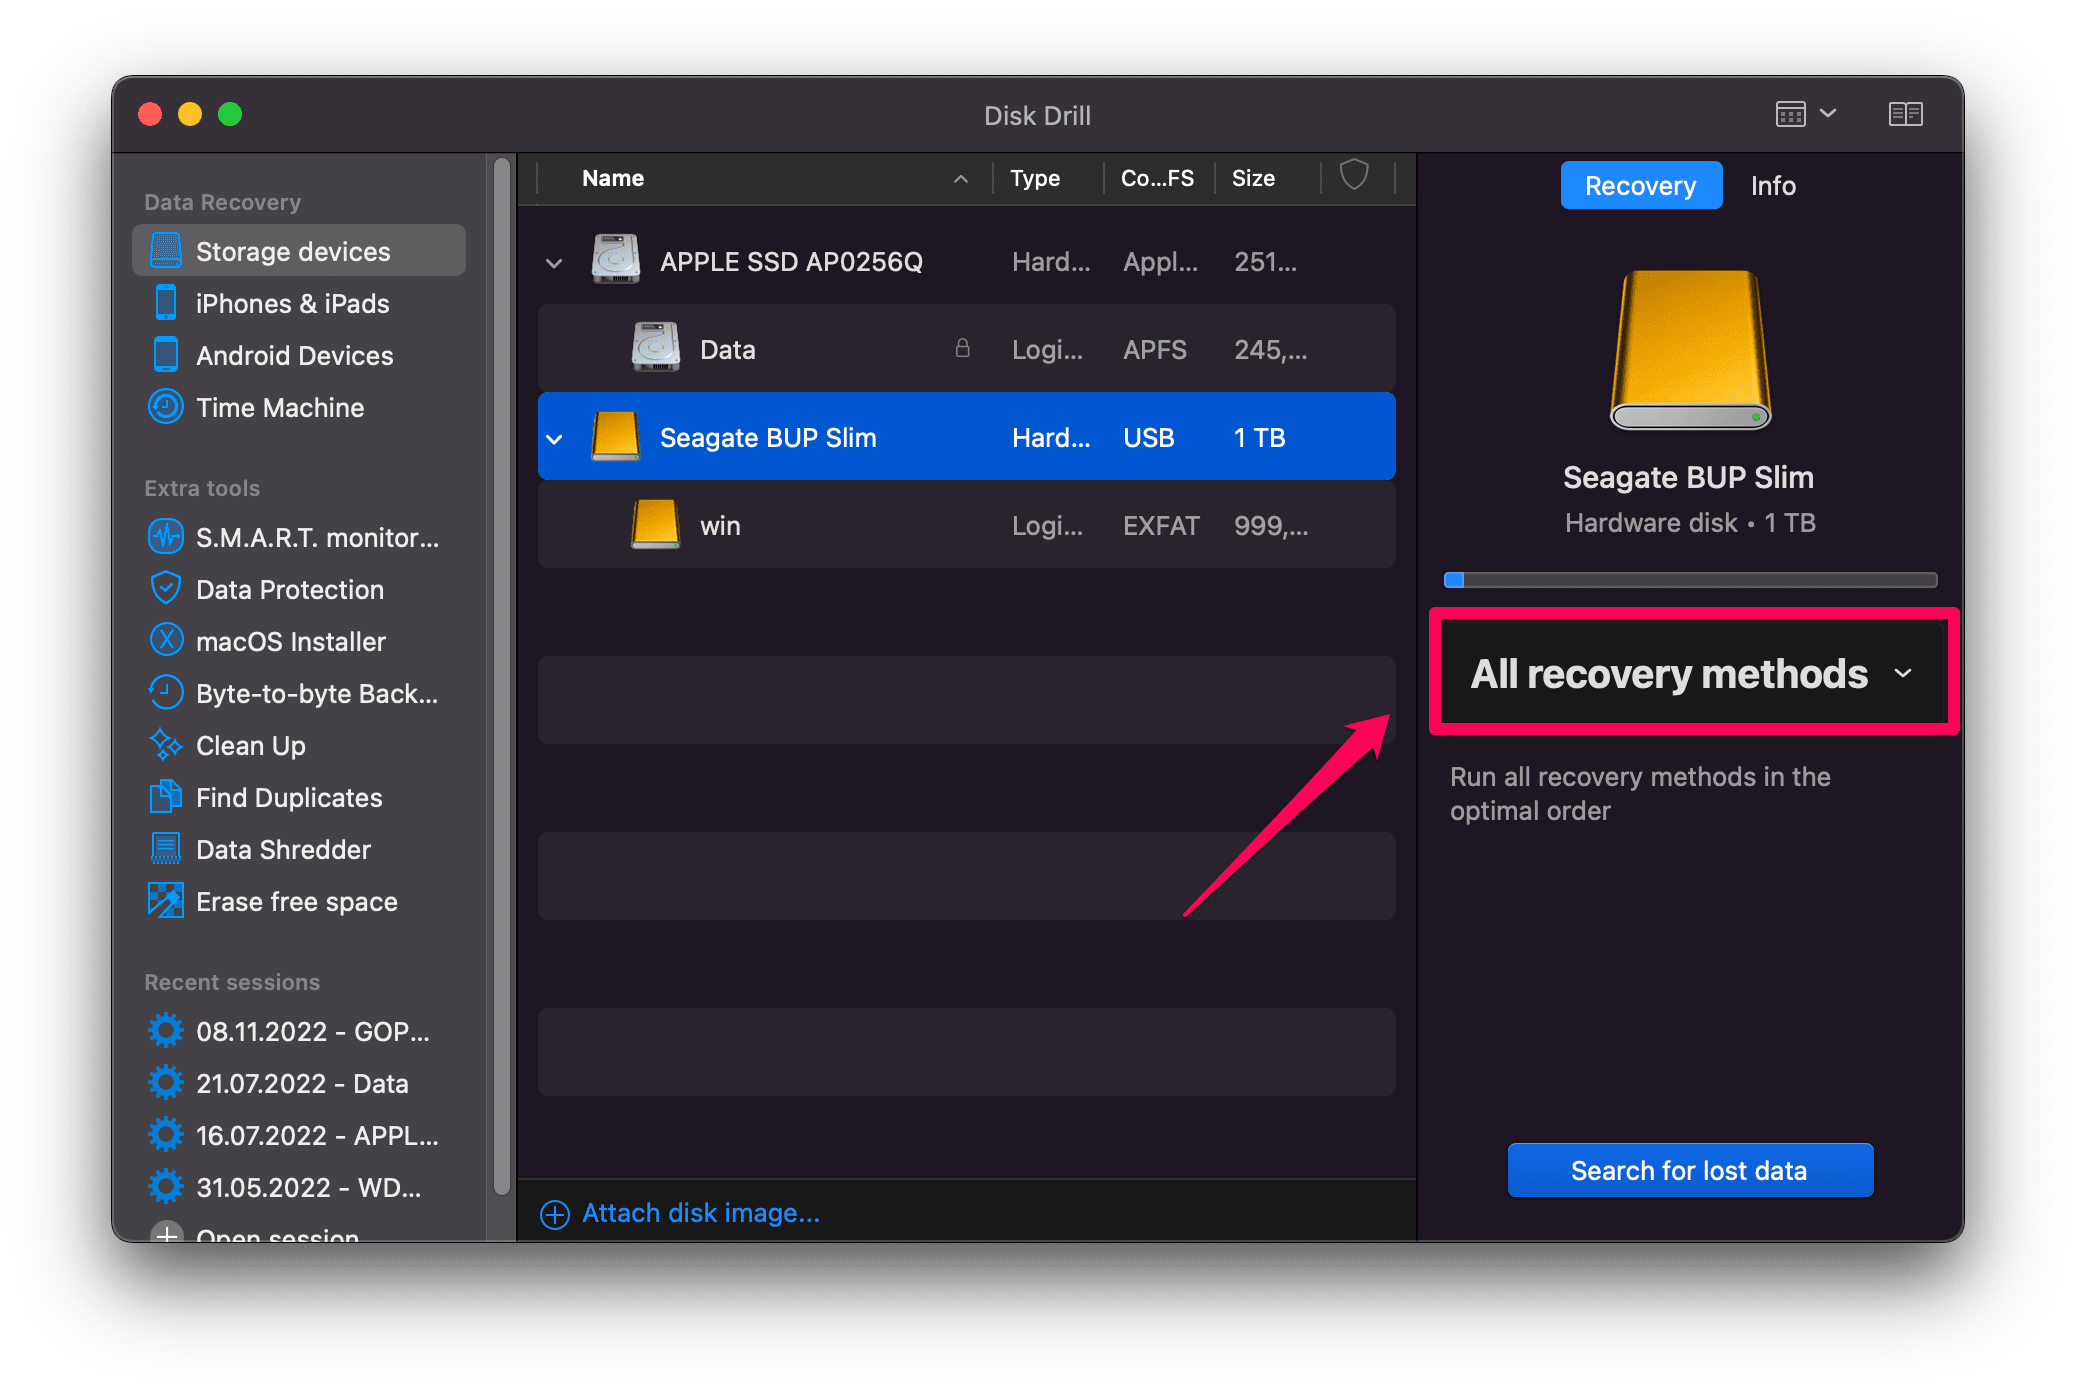
- Choose your Seagate drive from the list of drives
- Select All Recovery Methods
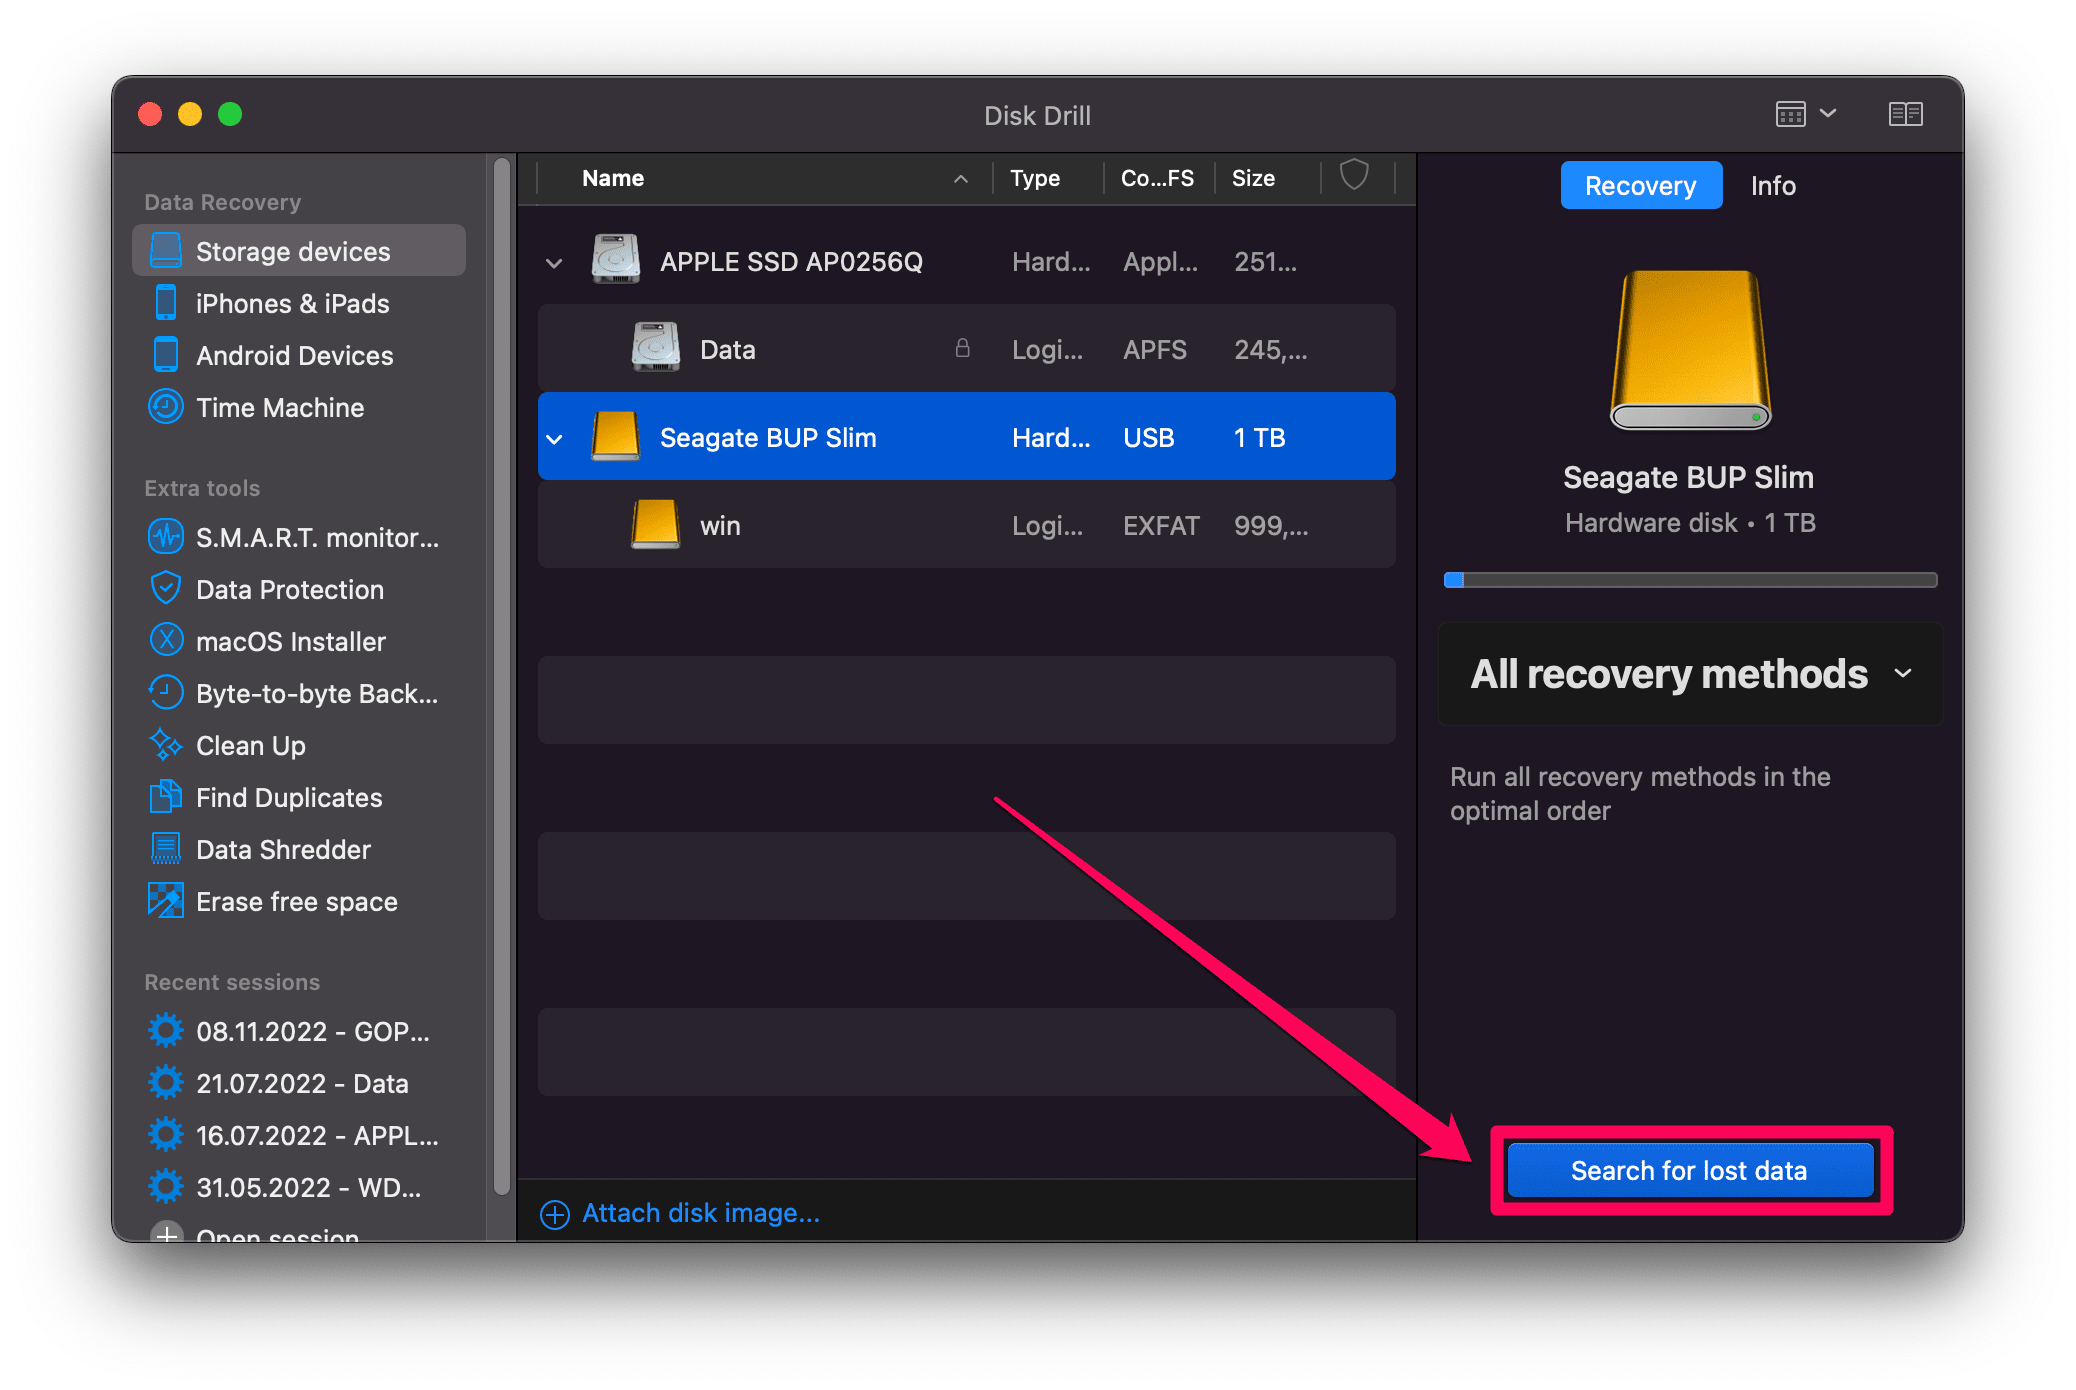
- Click Search for lost data
- Click Review found items in the bottom right corner
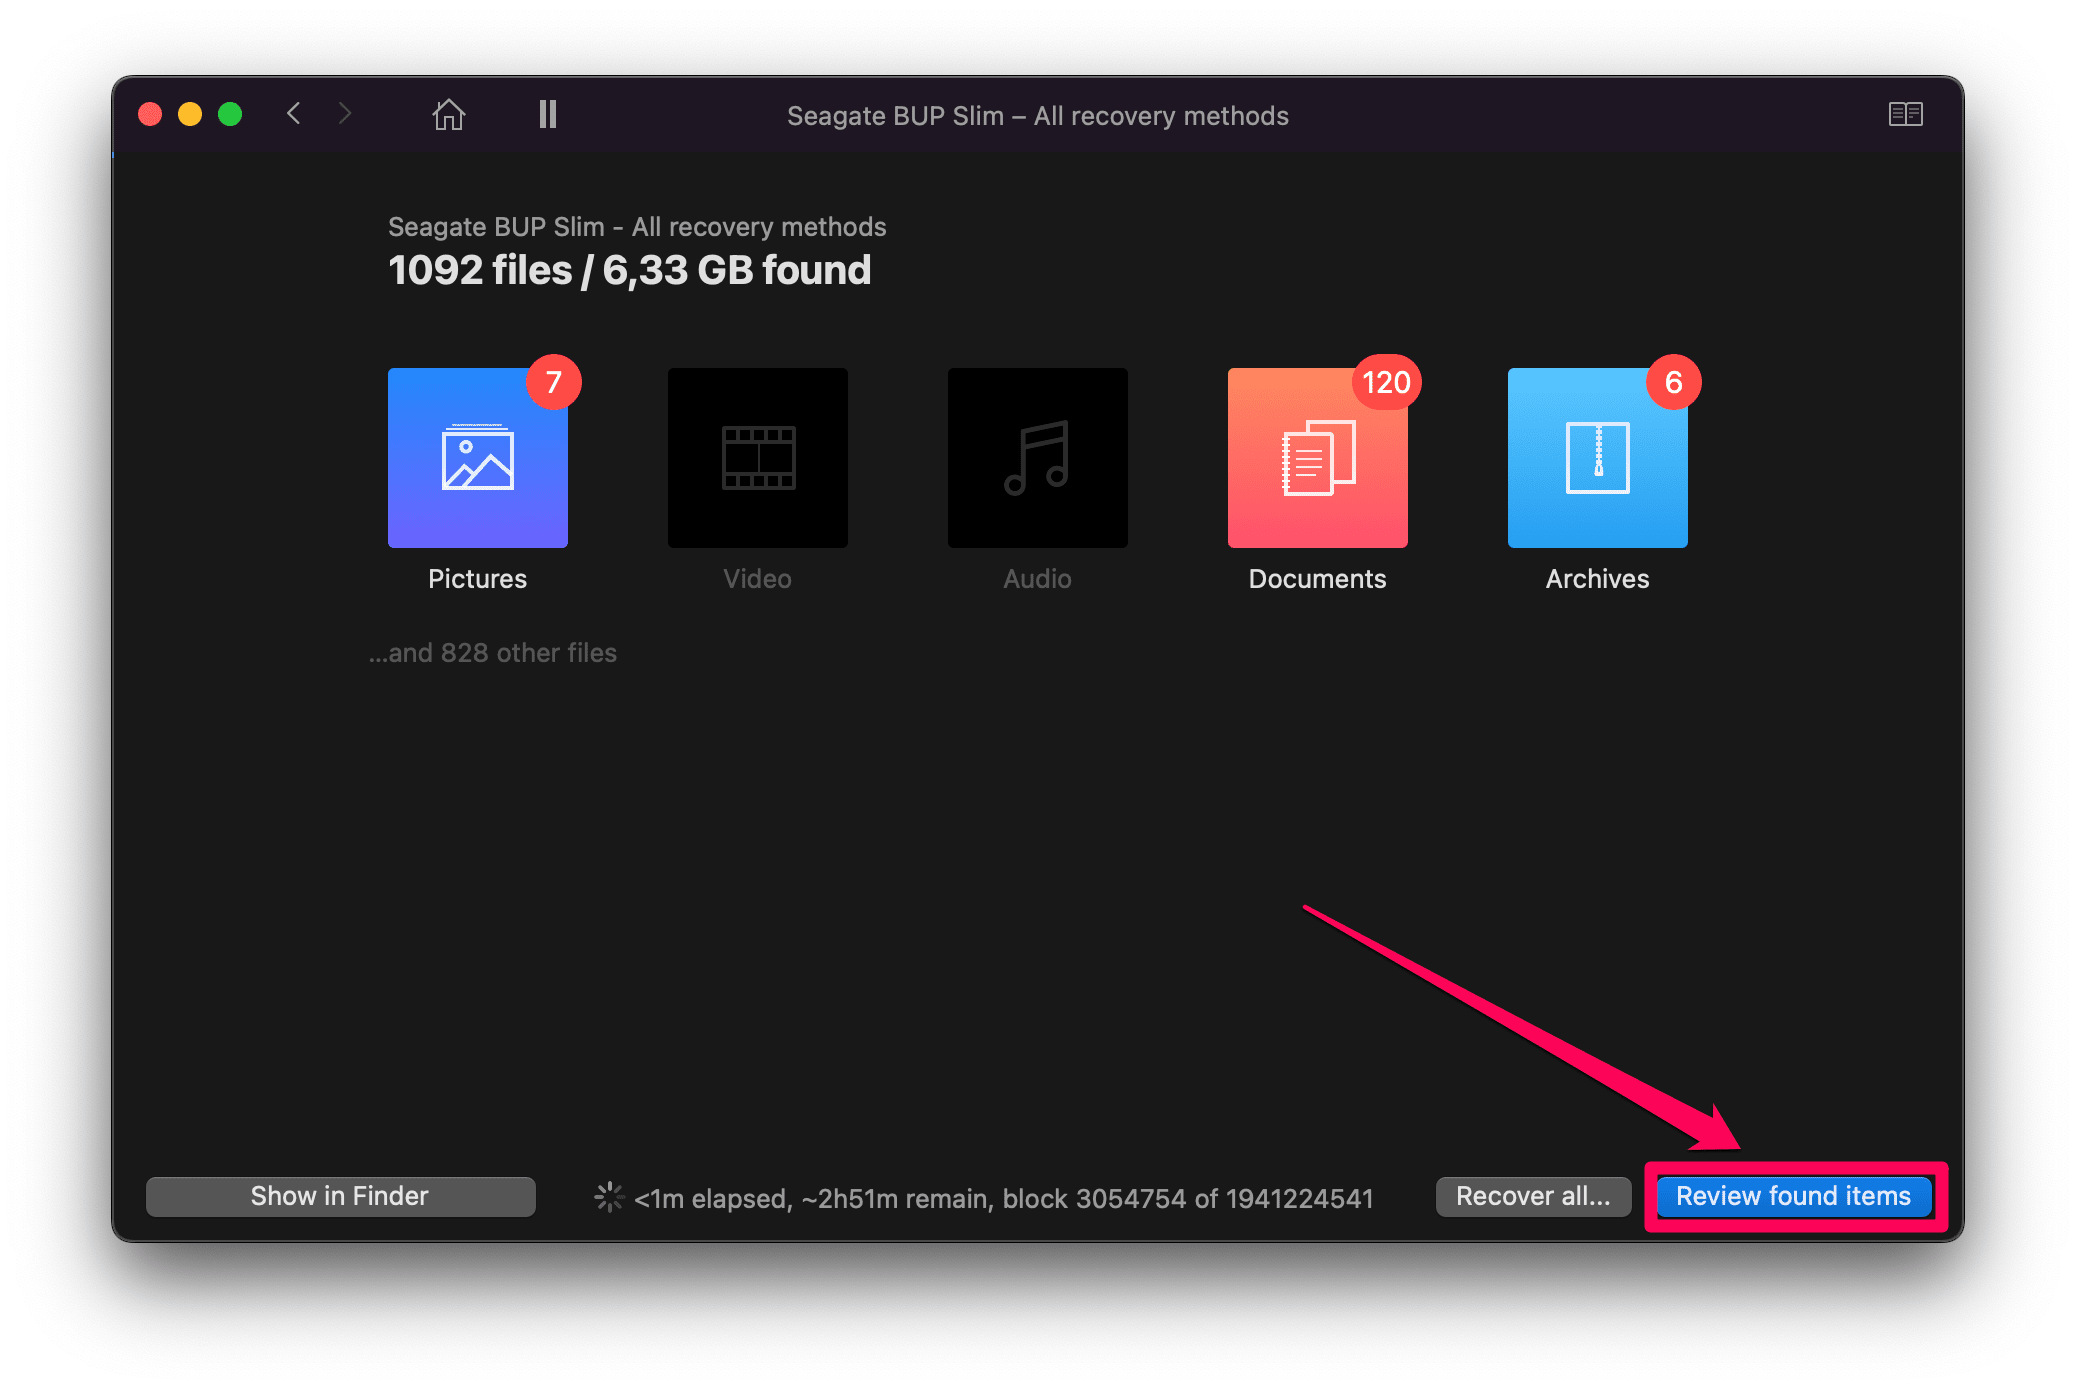
- You will see a list of files that can be recovered. Go through them and select any files you want to save.
- Always save your files on a separate drive! Otherwise you’re just going to overwrite existing files and the whole recovery process is going to fail.
Fix #2: Seagate Recovery Service
Data recovery services are a great way to rescue data that can’t be recovered through traditional means. However, they tend to be expensive and take a lot of time to process your orders. Success is not guaranteed either – it all depends on how the data was lost and the exact state of your hard drive.
The good news is, even if your drive has been physically damaged it may still be possible to extract your data from it. This can only be done in a specialized recovery center. It’s generally not possible to safely open and investigate a hard drive in your own home.
Seagate owners are in a particularly good spot in this regard. The company offers its own recovery service that boasts a 95% success rate when working on Seagate drives. This includes hard drives and SSDs alike. You will also receive your recovered data in encrypted form, giving you some reassurance that it won’t be intercepted on its way to your home.
Fix #3: Bonus Tip: How to Repair a Seagate External Hard Drive on a Mac
Seagate data recovery on a Mac can also be done with a built-in tool available directly in your operating system – Disk Utility. This is a bit of a last resort in most cases, as the program can’t do anything if your drive has been physically damaged. It’s still worth giving it a shot however, as it can sometimes bring your drive out of a bad state and allow you to at least extract your data from it.
To use Disk Utility to repair a Seagate external hard drive on your Mac, follow these steps:
- Launch Disk Utility
- Select your drive from the list on the right
- Click First Aid at the top of the application
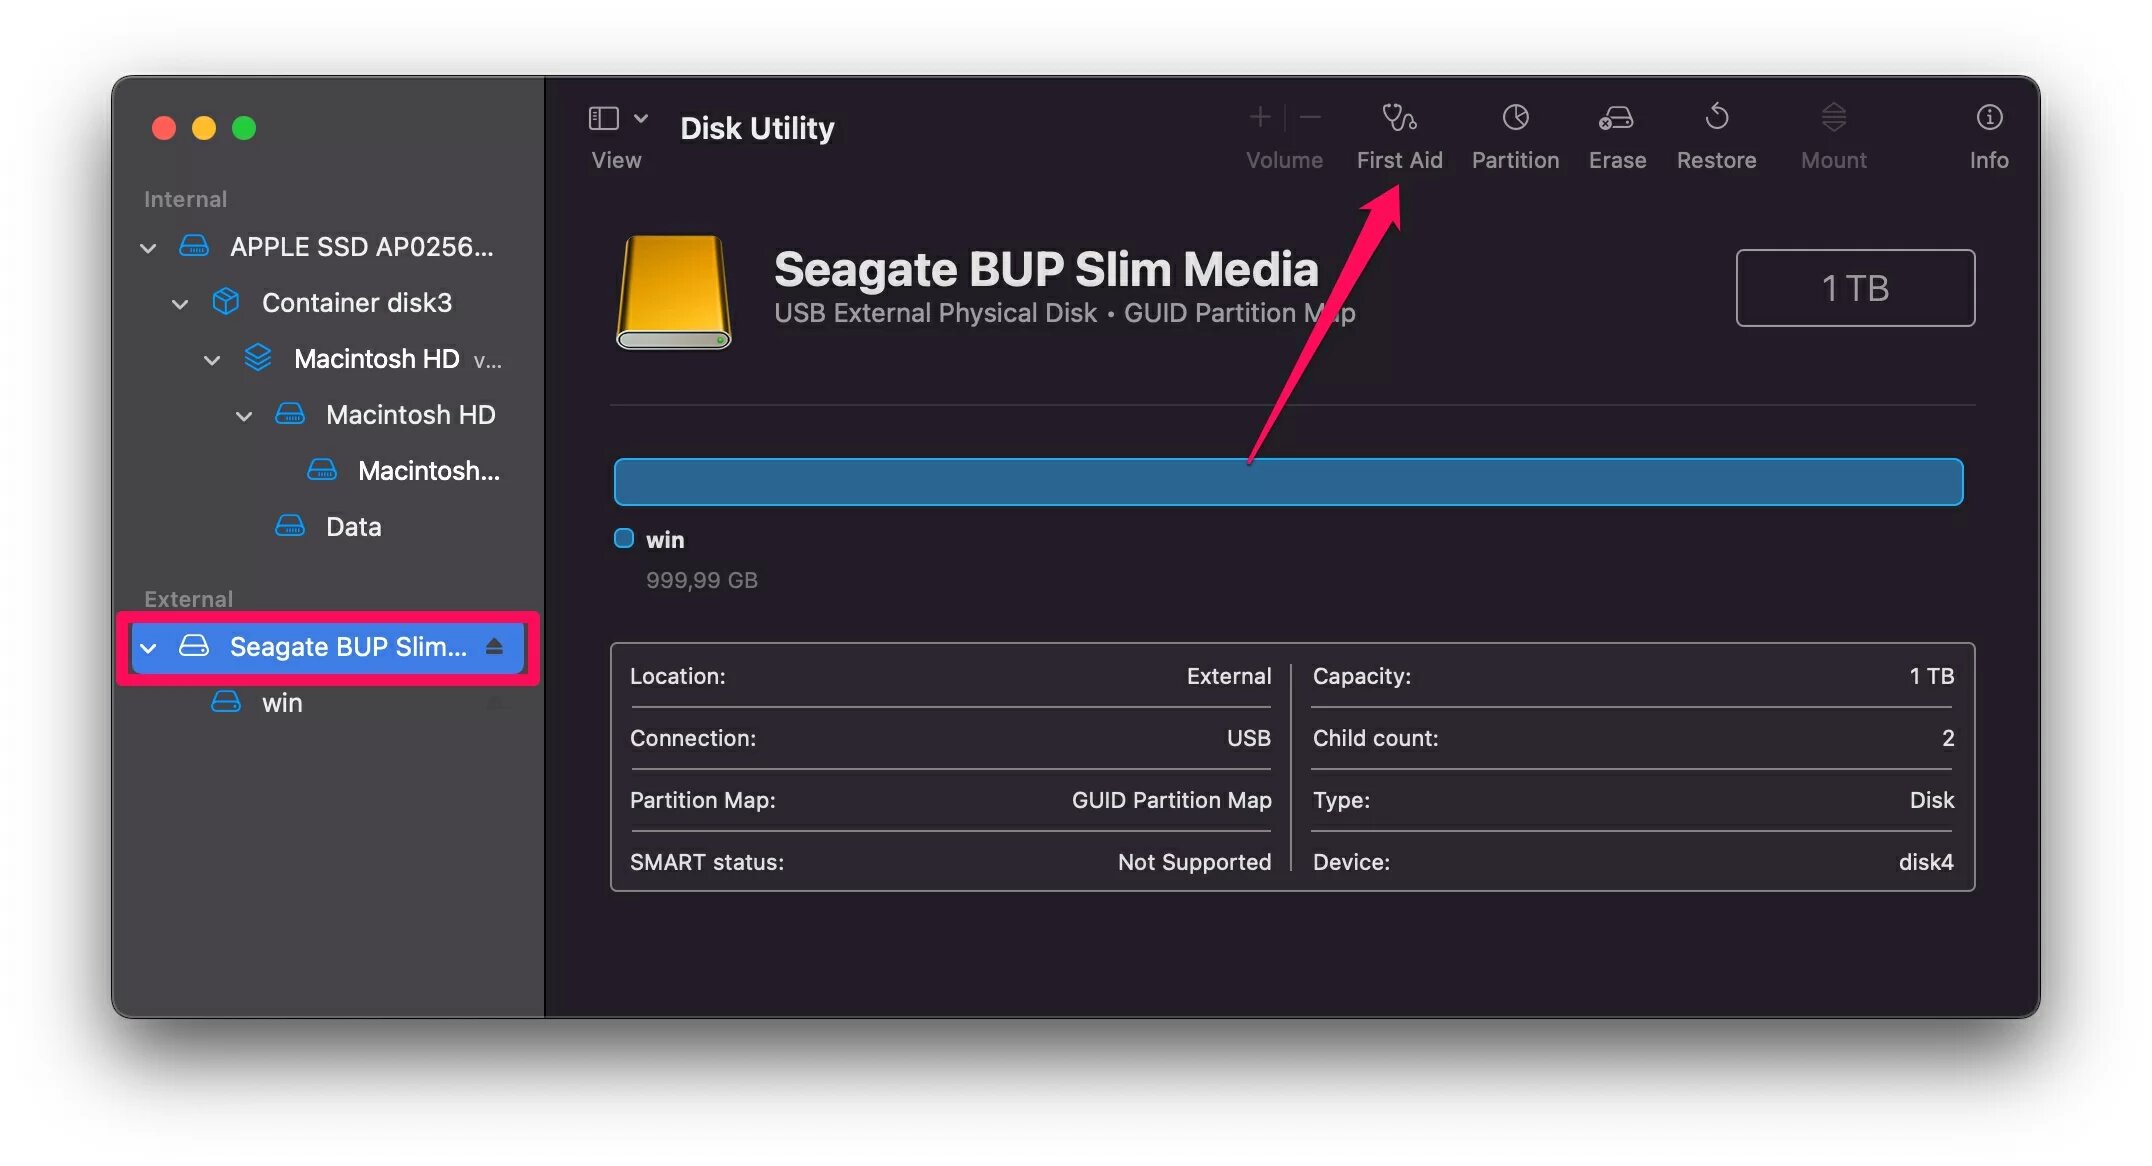
- Click Run

Once the process is finished, check if you can now mount and access your drive. If the problem was related to filesystem corruption or something equally simple, there’s a good chance your drive will now work again.
How to Protect Your Seagate Hard Drive on a Mac
You should take special care with Seagate external hard drives, especially when you’re on the go. As a general rule, hard drives are very sensitive to physical damage and you should avoid doing anything that could compromise the disk’s physical integrity.
If you want to minimize the risk of running into problems with your Seagate external hard drive on your Mac, here are some tips that could come in handy.
- 🚫 Never shake or hit your Seagate drive
- 🎒 Pack the drive carefully when traveling, and prevent any physical damage to it when you’re on the move
- 💾 Back up your data regularly. Don’t count on a single drive as your only storage point, and always maintain at least two separate backups of your important data.
- ⚠️ Avoid downloading suspicious software. Only use approved sources for downloading new applications.
- 🔌 Don’t plug your hard drive into unknown computers
- 🔏 Use encryption for really important data
- 💾 Be careful with the USB plug – don’t bend it in unusual angles
- 💽 Perform regular maintenance on your hard drive. Clean up unneeded files and run a defragmentation program.
Conclusion
If you’ve suffered an unexpected loss of data from your Seagate external drive, don’t worry just yet. It’s entirely possible that you can get your data back by using the right tools and solutions. It’s important to understand that this depends heavily on how exactly your data got lost in the first place and how you’ve been treating your drive.
To minimize the risk of unexpected data loss, you should always make sure to keep your drive in check by following the steps we listed in the previous point. Handling your drive carelessly is a fast way to lose all your important data. Depending on how badly you’ve messed up, it’s possible that you may not be able to get any of your data back at all. That’s why you should take a proactive approach and do your best to keep your drive – and the data on it – safe. The same goes for your Mac – a computer infected with malware can lead to similar problems.
FAQ
To recover files from a Seagate hard drive on your Mac, follow these steps:
- Download and install Disk Drill
- Connect your Seagate hard drive to your Mac
- Launch Disk Drill
- Choose your Seagate drive from the list of drives on the right side
- Click on All Recovery Methods, and wait for the scan to finish
- You will see a list of files that can be recovered. Go through them and select any files you want to save.
- Always save your files on a separate drive! Otherwise you’re just going to overwrite existing files and the whole recovery process is going to fail.
If your Seagate hard drive isn’t working on your Mac, it’s possible that the drive is corrupted. You may be able to recover it using Disk Utility by following these steps:
- Launch Disk Utility
- Select your drive from the list on the right
- Click First Aid at the top of the application
- Click Run
The price of Seagate’s recovery service varies, starting at $499 and going up to more than $2,000, depending on the exact circumstances of your incident and other factors.
If you use freely available tools, it doesn’t cost anything to recover data from a Seagate external hard disk. On the other hand, using services like Seagate’s data recovery service, you can easily pay several thousand dollars for more challenging situations.
If you don’t want to spend any money on your data recovery, you should use the Disk Utility method as we outlined above. Keep in mind that your success rate will be limited with this option. If your data was really important, you should be prepared to spend some money on its recovery. To do that, follow these steps:
- Launch Disk Utility
- Select your drive from the list
- Click First Aid at the top of the application
- Click Run