How to Restore Mac to a Previous Date
Table of Contents
Keeping a backup of your files is traditionally done by copying it and transferring it into an external hard drive.
For Mac users, Apple developed Time Machine. An app that’s meant to store old versions of your files, ready to be restored at a later date when needed. In this article, we’ll go through everything there is to know about how to restore a Mac to a previous date.
Why Restore Your Computer to an Earlier Date?
Normally, your computer is capable of running the most compatible applications and processes. It is responsive and can handle most simple and complex tasks. However, there’s a chance that it will slow down and become unstable. When this happens, you should consider rolling it back to its stable state.
Here are more reasons why you’ll need to restore your computer to an earlier date:
- 📁 To retrieve or recover deleted files
- 🗃️ To restore previous versions of files and folders
- 👾 You’ve downloaded suspicious files that contain malware
- 🌐 When applications behave abnormally due to a recent macOS update
How to Restore Your Mac to an Earlier Date
There are a couple of ways to restore your Mac to an earlier date, depending on the type of Mac you have. All options are easy to do, just follow the steps closely.
On M1 Macs
The most common way to restore MacBook M1s is through backups. One built-in and free solution is through Time Machine, which automatically creates backups of your Mac. As long as you did not disable Time Machine in the past, you should be able to restore your Mac to a previous version using it.
⚠️ Important: Before proceeding to the steps below, make sure to back up all of your recent files and apps to an external drive, like an external hard drive or flash drive, as the files will be deleted during the restoration process.
To restore your M1 Mac to an earlier date via Time Machine, follow these steps:
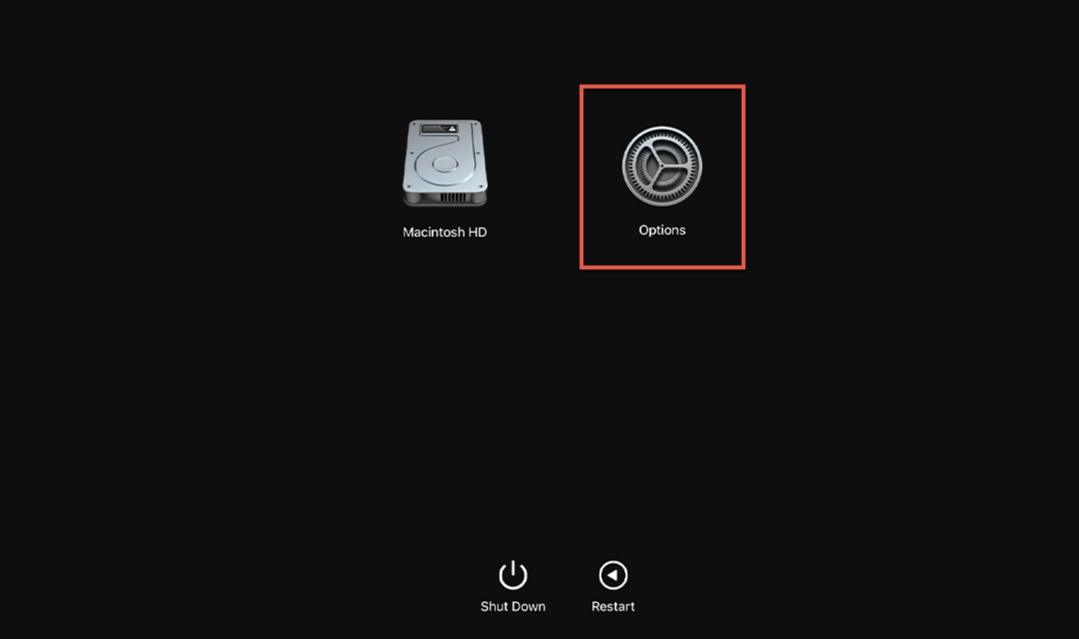
- With your Mac turned off, press and hold the Power button until you see the Startup options loading screen.
- Select Options and select your account. Type in your Macbook’s password.
- Once logged in, choose Restore from Time Machine Backup.
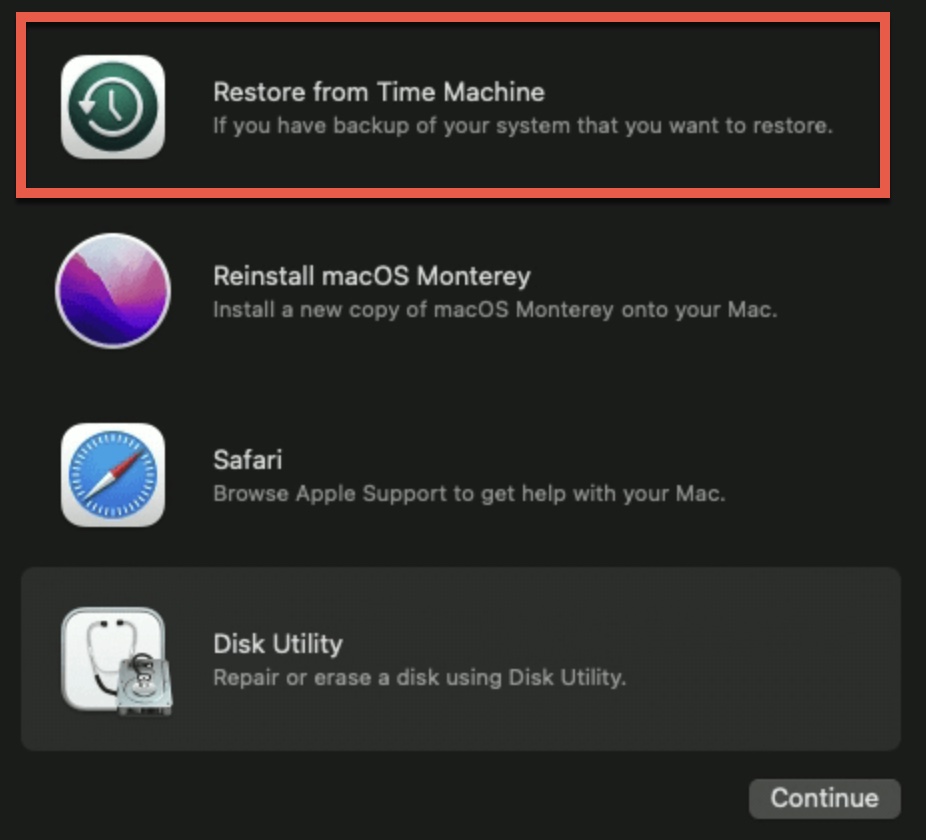
- Now, choose the desired date where you want your Mac to be restored to and follow the next on-screen steps.


On Intel-based Macs
Like M1 Macs, Intel-based Macs come with Time Machine as a backup option. The steps to restoring these backups can vary slightly but they have a similar process overall.
To restore your Intel-based Mac to an earlier date via Time Machine, proceed to these steps:
- Completely turn off your Mac.
- Then, press the Power button and Command + R buttons on the keyboard. You will soon see a spinning globe on the screen.
- Release the buttons and enter your Mac’s username and password.
- Select Restore from Time Machine Backup.
- Next, choose the date that you want your Mac to be restored to and follow the rest of the on-screen instructions.
Read also: How to Restore Downloads Folder on Mac
How to Restore All Your Data Without Time Machine
In the event that you weren’t able to create backups through Time Machine, you can still use a third-party data recovery software solution like Disk Drill. You won’t be able to restore your computer to an earlier date through it, but you will be able to restore specific data that you lost.
Using Disk Drill
Disk Drill is a powerful software tool that’s capable of restoring deleted and missing files when you don’t have a backup in place. It supports 300+ file formats, and has a straightforward installation process.
To use Disk Drill to restore your data without Time Machine, follow the steps below:
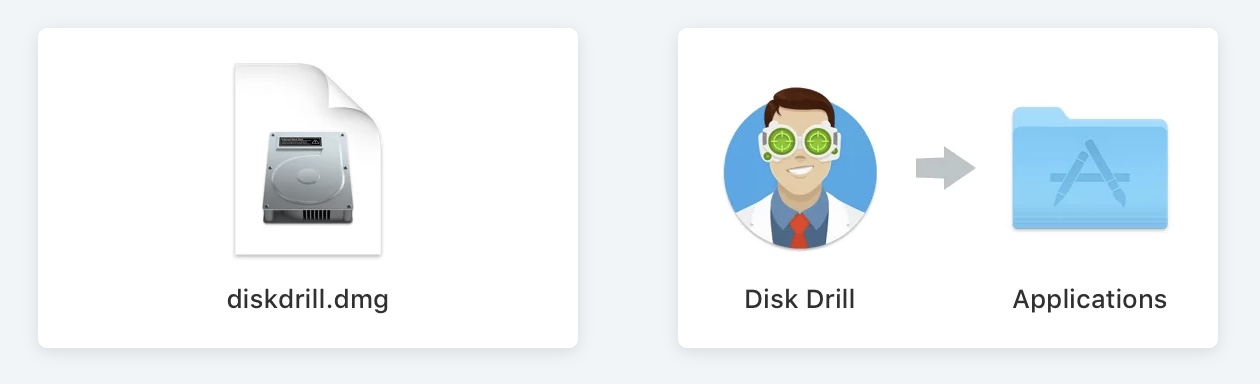
- Download and install Disk Drill for Mac through this link.
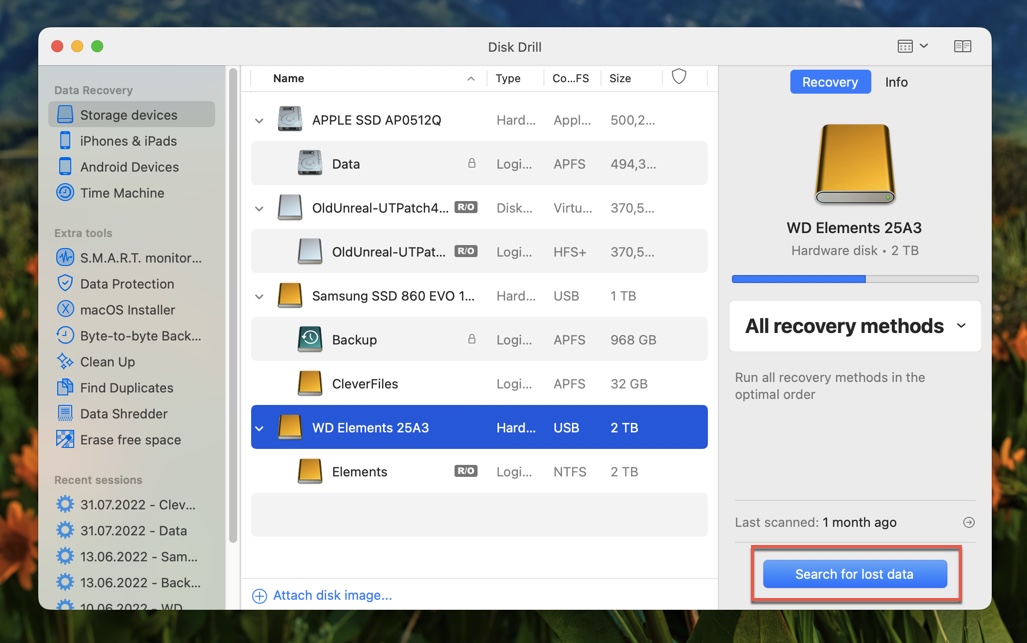
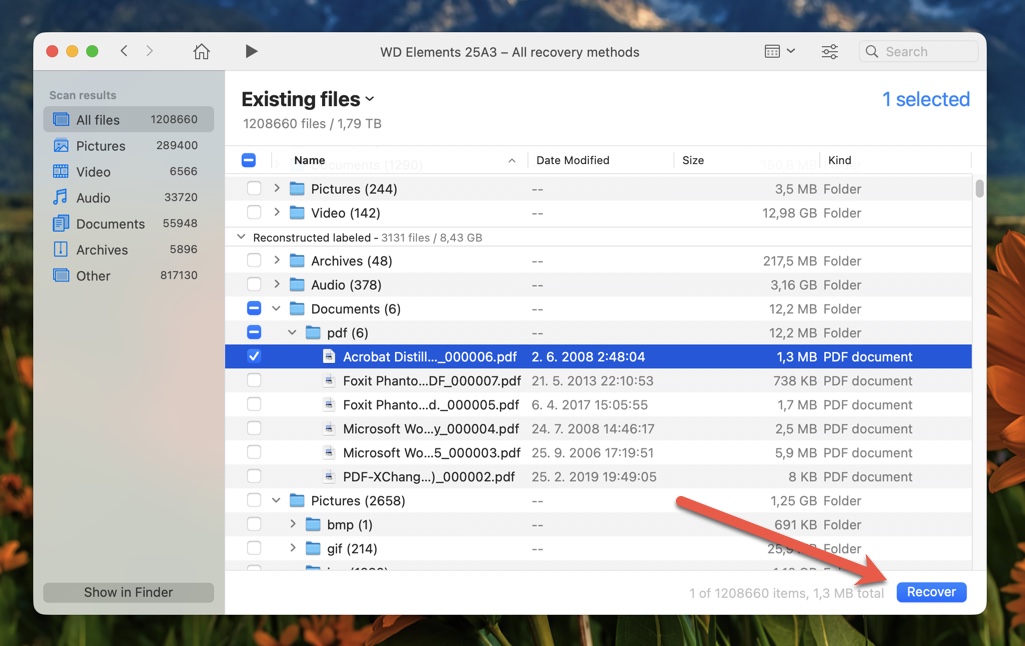
- Launch the app and select the drive that you want to restore files from. Click Search for lost data.
- After the scanning process is complete, your files will be sorted according to common file types:
- 📷 Pictures
- 📹 Video
- 🔊 Audio
- 📄 Documents
- 🗃️ Archives
- Next, you will be shown all recoverable files. You can sort them according to Name, Date Modified, Size, and Kind.
- Once you’ve found the file that you want to recover, select it and click the Recover button found at the bottom-right corner of the window.
- Select your desired file destination and click OK. You can find the file on your selected folder on your Mac.


To have full access to Disk Drill’s features, you’ll have to purchase its Pro version. For more pricing information, click here.
Conclusion
To restore computer to earlier date Mac, it’s necessary to have a backup. System restore on Mac can be done easily by using Time Machine, which is a built-in feature on most modern Macs.
However, if you don’t have a backup in place, you can also use a third-party software tool like Disk Drill to restore your data. It’s an effective tool for data recovery that has additional features that help protect your data. Disk Drill supports 300+ file formats and has various recovery methods to choose from.
FAQ
No, it’s not possible to restore Mac to an earlier date without a Time Machine backup. However, it is possible to recover deleted files from any date using a third-party data recovery tool like Disk Drill.
Another data recovery option you can try is through your iCloud, provided that you regularly do backups using it.
If you’re wondering “how to restore my iMac to an earlier date” or how to go back in time on Mac, it’s possible as long as you have your Time Machine backup ready. It’s one of the many utility apps on your Mac, regardless if it’s M1 or Intel-based.
To restore your Mac using Time Machine, just follow the detailed steps above.
No, there is no restore point in Mac. Time Machine is the only way to restore your Mac to an earlier date. Unlike Windows, Macs typically don’t generate system restore points.
If you’re thinking about creating a restore point now, you can use a clone drive and restore files through Disk Utility. This way, you’ll generate an alternative copy for your current hard disk, which can be used as a restore point later on.
If you’re experiencing issues restoring your Mac from Time Machine, check the following:
- Make sure that the backup disk that you’re using is supported by Time Machine.
- Ensure that the backup disk is directly connected to your Mac via USB. Avoid using USB hubs or other related devices.
- Ensure that the firmware of the backup disk is updated to its latest version.
- If you’re using a network backup disk, verify it first through the Verify Backups option:
- First, go to Time Machine.
- Then, press the Option key.
- Select Verify Backups on the menu.
If you’re one of the many users who are wondering, “how do I restore my Mac to yesterday?”, you can do this by accessing your Time Machine backups. It is better if these were saved in an external backup disk.
Here’s how you can access your Time Machine backups on your Mac:
- Connect your backup disk directly to your Mac via USB.
- Launch the Finder app and click on your backup disk below the Locations sidebar.
- Double-click the folder named Backups.backupdb and open the folder with the name of the Mac.
- Here, you’ll see all the available backups which are named based on their backup date.
This is why, in general, you should try to avoid moving, renaming, and deleting files from your Time Machine backup to avoid issues once you need to integrate them back into your Mac.