How to Back Up Your Mac: Your Complete Guide
Table of Contents
Your Mac contains the essential elements of your life. Losing your files could be catastrophic!
That’s why knowing how to back up your Mac is essential in 2022. This guide takes you through the steps needed to help you maintain access to your critical files, even in the worst-case scenario.
How to Back Up Your Mac
When using macOS, Apple offers solutions for file backups that only take a few clicks to initiate. You can also take a more traditional approach by storing copies on different drives to ensure your access remains.
1. Use Time Machine for Mac file backups
Time Machine is the easiest way to back up all of your Mac files. You must have an external storage device for this method to work using the recent versions of macOS.
When you have it activated, Time Machine creates hourly backups for the past 24 hours. You’ll also get daily backups for the past month and weekly backups for all other months.
Once your external drive is full, the oldest backup files get automatically deleted.
After selecting an external drive with enough storage space, you can use this method to back up Mac files by following these steps:
- Open your Time Machine preferences from its menu or through the System Preferences dropdown.
- Click on the option to “Select Backup Disk.”
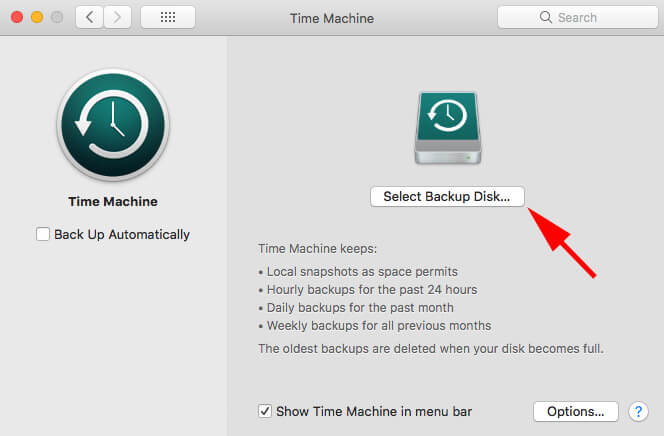
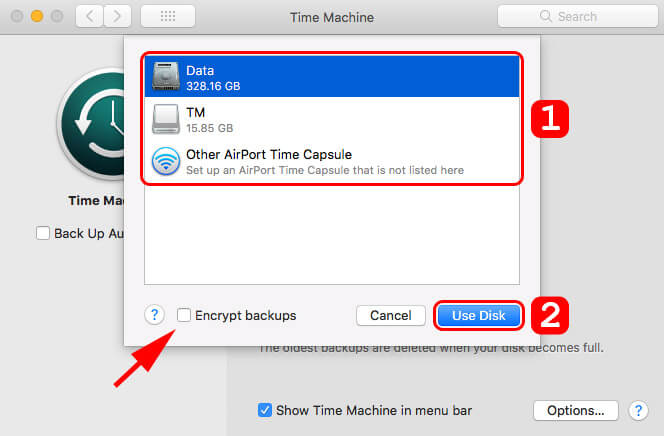
- Choose the external drive from the list of available media. If you only have one item connected, it will be the only option.
- Click the box next to “Encrypt Backups” if needed to provide additional security for your files. Finish by clicking on “Use Disk.”

If the disk you choose isn’t formatted for Time Machine’s requirements, you’ll get asked to erase the external storage first. Click the “Erase” button to proceed, but only after you’ve retrieved any files you need to save.
| Pros of Using Time Machine | Cons of Using Time Machine |
|
|
2. Create a bootable backup of your Mac
If your Mac’s startup processes become corrupted for some reason, your computer might not even make it to the Apple logo. When it continues to freeze without giving you access to macOS (it won’t chime), that means a bootable backup disk is necessary to regain access.
The most common reason for this issue is a dead hard drive. If you have a cloned copy available on external media, you won’t lose your information and still have access to the rest of your system.
You must have a copy of your Mac’s hard drive available before it fails for this method to work.
If your hard drive refuses to work, your only option might be to hire a physical recovery specialist.
When you have a cloned backup available on external storage, just follow these steps for a successful outcome.
- Plug the external drive into your Mac computer.
- Press the power button to start the booting cycle.
- Hold the option key as the computer turns on.
- Choose the external drive when you reach the screen that allows you to select the booting options.

| Pros of Using Bootable Backup | Cons of Using Bootable Backup |
|
|
3. Use cloud-based services for regular back up needs
Cloud-based services function as an off-site external drive. You can purchase the amount of storage you need, transfer your files, and use it to restore your Mac during emergencies.
The most popular option for Mac users is iCloud. You can easily add your document and desktop files to this storage option if you’re using the latest macOS version and signed in with the same Apple ID.
You’ll need to turn on iCloud Drive on your Mac to get started.
It’s either drag-and-drop or copy-and-paste to move files and folders from your Mac to the online cloud storage provider.

Several options are available to consider if you prefer to use something other than iCloud.
Although all of them have different instructions to follow for Mac users, the methodology of transferring files is relatively the same.
Each provider has different fee structures to review before selecting the best one to meet your needs.
| Pros of Using Cloud-based Services | Cons of Using Cloud-based Services |
|
|
4. Take advantage of the services offered by third-party apps and software
Third-party apps can provide file retrieval, backup solutions, and additional Mac information support.
The best option in this category for backing up your Mac is Disk Drill. It delivers a comprehensive software suite that lets you be in charge of every possible issue you might face with your computer.
You’ll find that it delivers an intuitive interface, fast results, and a reliable performance with cross-platform support.

Several other providers are in this space if you want to preview Disk Drill alternatives.
- Acronis Cyber Backup. It’s more expensive than Disk Drill, but it delivers solutions that cover public clouds, mobile devices, and local needs.
- Veeam Backup and Replication. This alternative is also more expensive. You receive instant file-level recovery and VM.
- Arcserve UDP. It delivers physical, virtual, and cloud-based workloads for a complete disaster recovery solution.
| Pros of Using Third-party Apps | Cons of Using Third-party Apps |
|
|
5. Use external storage to store file copies
A reliable external storage drive can help you store plenty of Mac backups so that you have access to whatever information you need.
Although prices for 2 TB external storage drives can be $100 or higher, it’s a long-term investment that doesn’t require a monthly subscription.
Several solutions are available to help you get the best backup solution for your Mac today.
- Western Digital My Book 8 TB Drive. This option uses a USB 3.0 connection with backward compatibility to provide high levels of versatility.
- Buffalo MiniStation Extreme NFC. You get 2 TB of external storage with this option, but the standout feature is its compact and rugged design. You also receive 256-bit AES encryption security with it.
- Samsung SSD T5. You’ll want the 2 TB version of this SSD external drive for your Mac backups. It reaches speeds of 550 MB per second, making it one of the fastest solutions available today.
- G-Technology G-RAID with Thunderbolt. You get up to 24 TB of storage for Mac backups with this solution. It also lets you easily remove the disks for long-term storage when needed. You even get an HDMI port on the back.
| Pros of Using External Storage | Cons of Using External Storage |
|
|
Why Do You Need to Back Up Your Mac?
When you have file backups available for your Mac, you can automatically create secondary access levels to all of your personal files.
This effort ensures that your documents, emails, photos, music, spreadsheets, databases, and other files are stored separately from your internal drive.
If there is another set of files and folders with your critical information available to access, you can retrieve your data even if it gets accidentally deleted, erased, or reformatted.
How Much Space Do I Need for a Backup?
You should use 150% of the current drive space that you have on your iMac, MacBook, or Mac Mini system for a backup drive. That means you’d want to have 750 GB available for a 500 GB system.
If you use a lightweight Mac setup with only 256 GB of SSD, consider stepping up your backup storage to 250% of what you currently have.
You can use a mix of external drives and USB storage to achieve this result. If you need to clone your Mac to have a bootable backup, everything must fit on the same disk.
How to Restore a Mac from a Backup
Once you have a backup available to use as a bootable disk, you can restore your Mac when it suffers a catastrophic loading event.
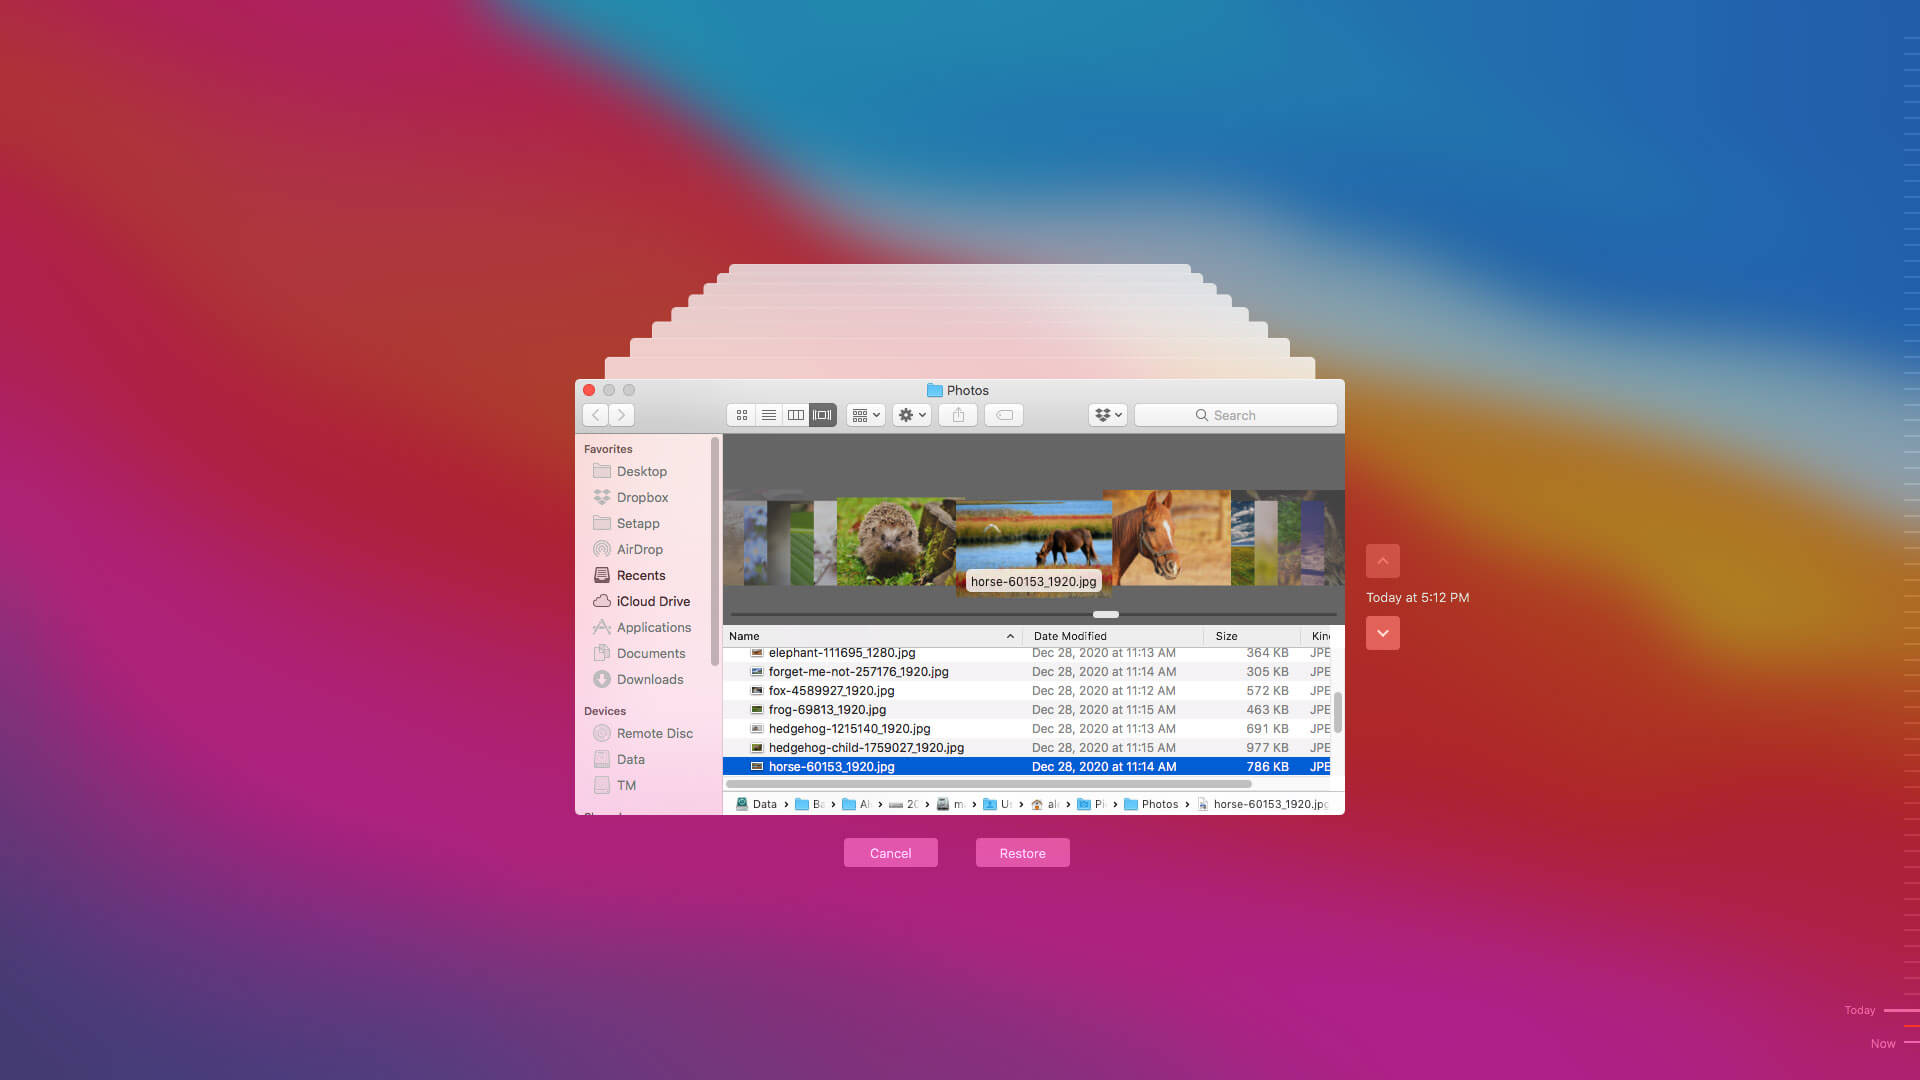
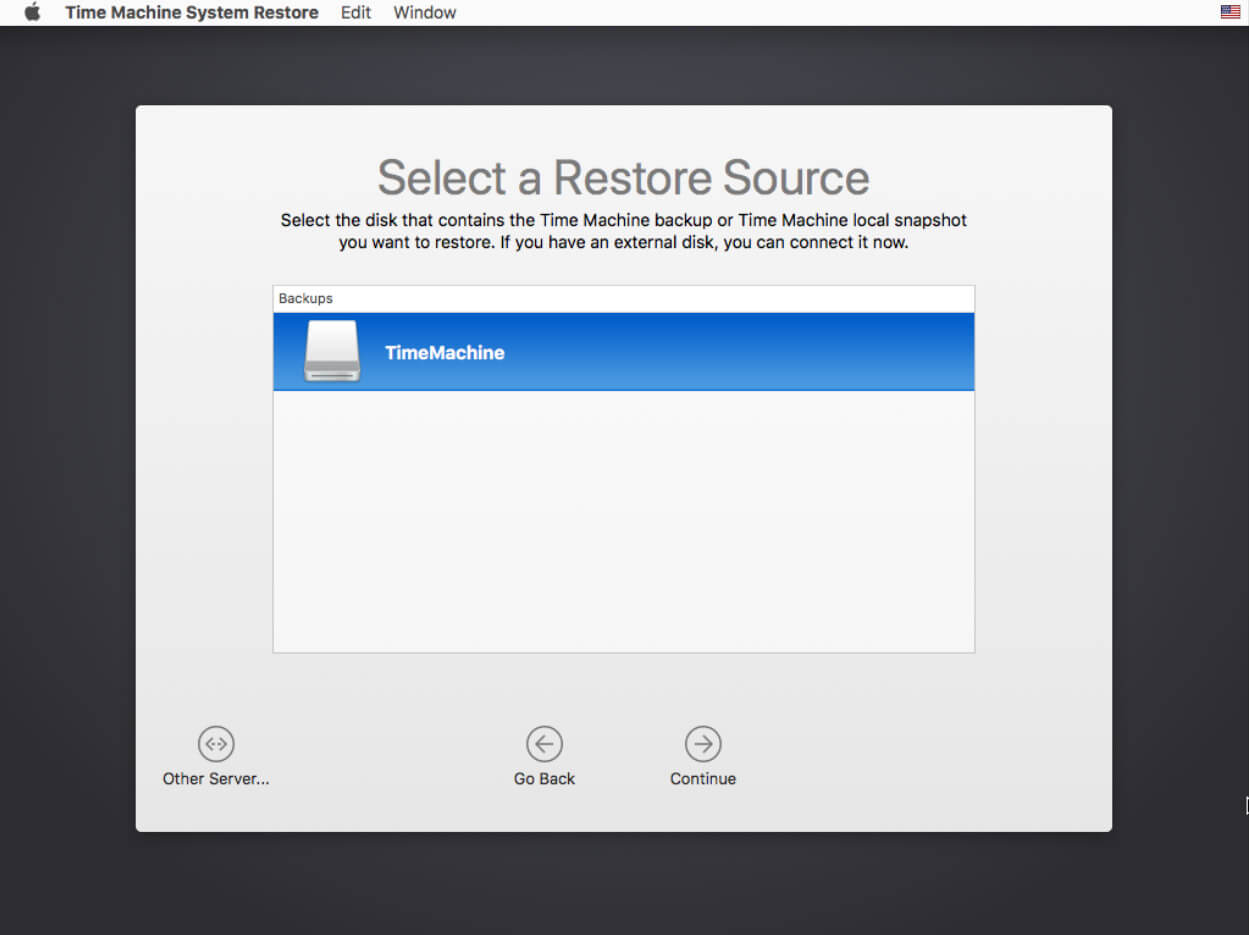
Time Machine backups provide the easiest restoration method. You can accomplish a favorable outcome by following these steps:
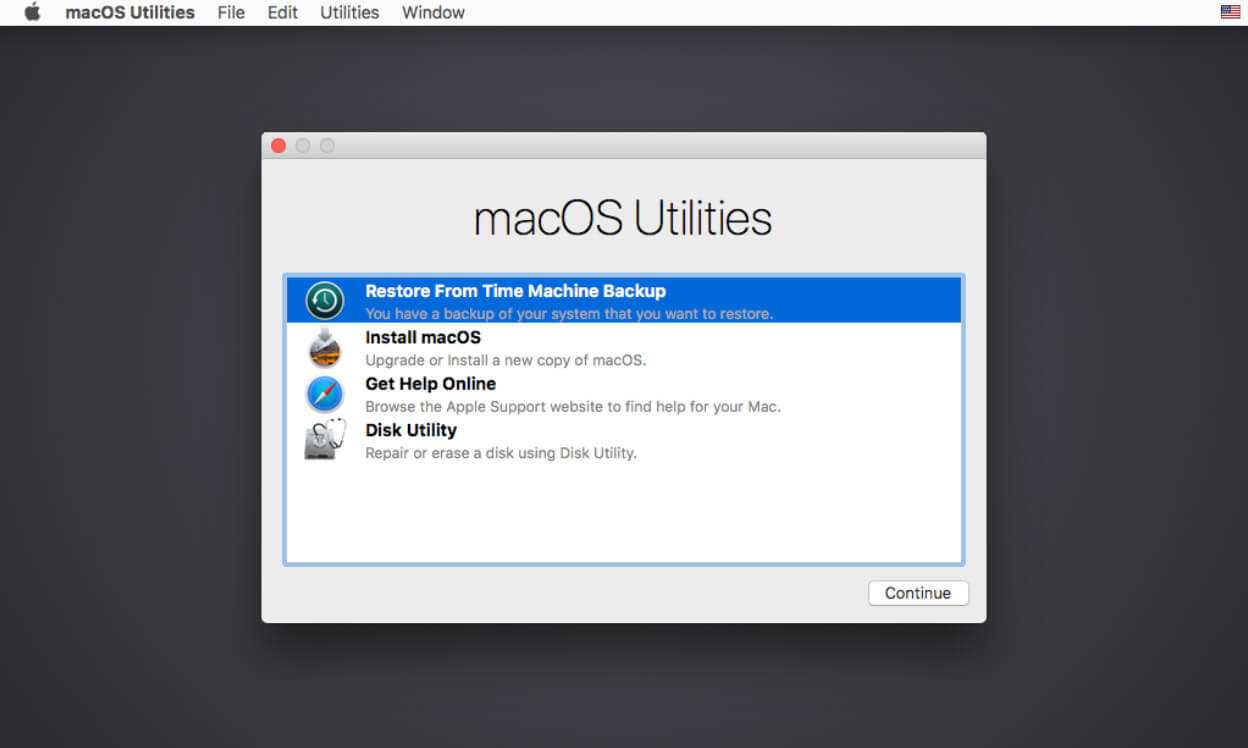
- Hold COMMAND+R during the Mac startup sequence, keeping the shortcut depressed until you see the spinning globe or Apple logo.
- After the Utilities menu appears, select the Restore option from “Time Machine Backup.” Click on the “Continue” button (and a second time, if necessary).
- Select the Time Machine backup you have from before your problems started. Click on the “Continue” button.


This process uses the previous files to replace the current ones on your computer. Anything that you need from the restoration point date until today needs to get backed up to have it save your information.
You can also create a bootable installer for macOS to restore your computer from a backup.
In Conclusion: Backing Up Your Mac in 2022
Knowing how to back up your Mac can help you avoid a potential future headache. Although you might need some additional resources, such as an external drive, it is worth the investment to accomplish this outcome.
When you know that your files are protected on multiple levels, you can stay confidently productive each day.
Once you have an external drive available to use, don’t forget to activate Time Machine!
FAQ: How to Back Up Your Mac
You must copy files from your internal drive to an external one to create a complete backup of your macOS system. It is also possible to use Time Machine to back up your Mac.
You can perform a manual backup of your Mac by transferring files from Finder to your external or USB drive.
It is also possible to save a complete image of your drive using third-party services that you can transfer to iCloud or an external drive.
If you have a non-functioning MacBook, you can use a drive reader to supply power to the storage. Connect it to your iCloud or another external drive to transfer the files you want to keep.
The easiest way to see if you have a backup available in iCloud is to log into your account. You can see what is saved by visiting icloud.com.
Yes! You can use any manual method of file copying and transfer to move your data from one drive to another under your control. One of the easiest ways to accomplish this step is to organize your files into folders to compress and move them.
You can back up a Mac without an external drive by using cloud-based features. If you select iCloud as your primary provider, you’ll receive your first 5 GB of storage free. Additional 50 GB allotments are available for $0.99 each in the United States. Different rates may apply internationally.
Google Drive, Dropbox, and similar providers offer the same service.
After logging into your Google Drive, you can manually transfer the files you want to keep to this cloud-based service. You can even upload a shared drive to streamline this process.