How to Free Up Storage Space on Your Mac
Table of Contents
Most people find that their iMac or MacBook tends to slow down after 2-3 years of use. Instead of buying a brand-new computer when this happens, invest more into knowing how to free up storage space on your Mac.
The primary reason why Macs start getting slow is that they have too many files and not enough memory. Both problems are solvable, although this guide looks at the former option only.
If you follow the steps in this guide, you can likely clear up enough space on your Mac to have it running better by tomorrow.
15 Best Ways to Clean Up Your Mac and Free Up Space
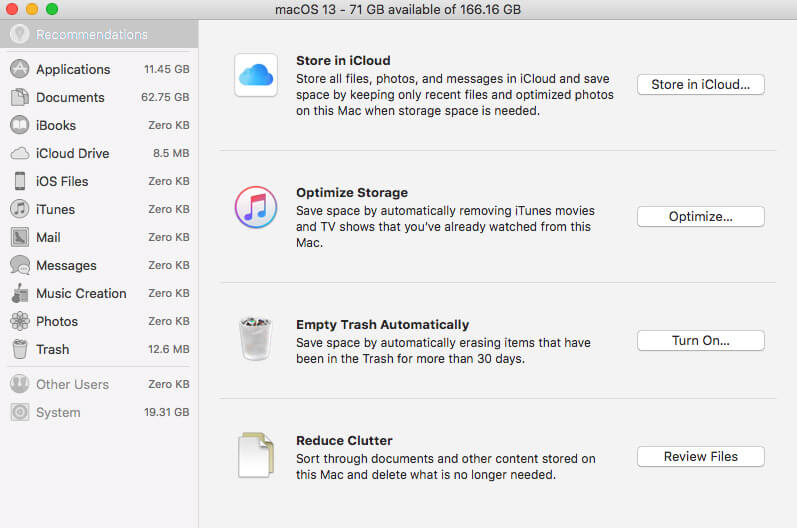
Once you’ve evaluated how much space is available on your Mac system, you’ll want to review the options you have for reducing your storage percentage.
Several of these options come from the Storage Management window. You can choose many of them on the same screen.
Open the Storage Management Window when needed with these steps:
- Open the Apple menu.
- Select About This Mac.
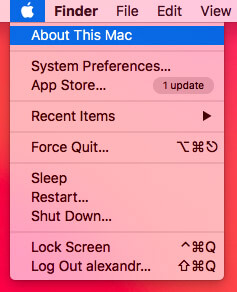
- Click on Storage and then Manage.


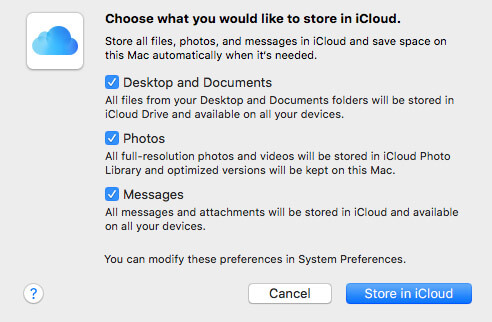
1. Store in iCloud
You can store all of your photos, messages, and files in iCloud to reduce how much space gets used locally. This option lets you retain recent files and optimizes images when you need the extra room.
| Pros: | Cons: |
|
|
Usage:
- Open the Storage Management Window.
- Click on Store in iCloud.
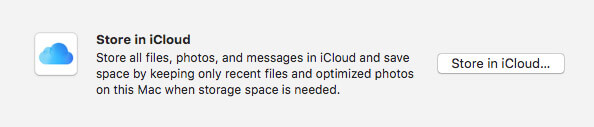
- Select the types of files you want to store in the cloud rather than on your Mac.


2. Optimize Your Storage
This option allows you to automatically remove shows and movies if you’re using Apple TV on your MacBook Air, MacBook Pro, or iMac. It can also remove any email attachments that aren’t recent to free up more space.
| Pros: | Cons: |
|
|
Usage:
- Open the Storage Management Window.
- Click the Optimize button.

- Click Optimize again to verify the activity.

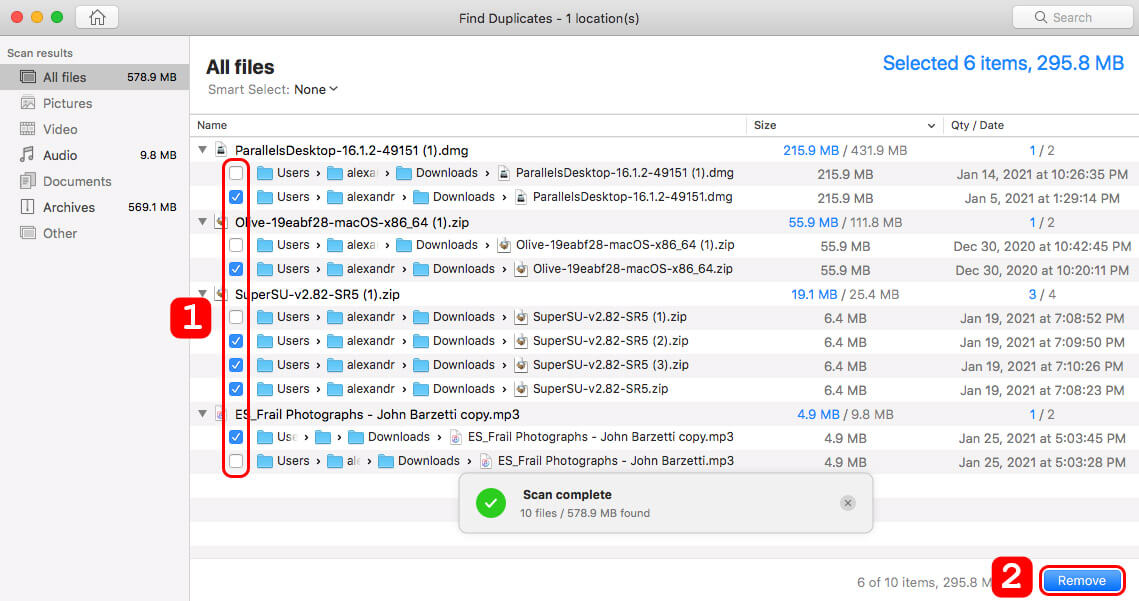
3. Remove Duplicate Files
You can search through Finder for specific file names that are potential duplicates. If you’re not sure what files might have multiple copies, you can use the search box to look for the duplicated extension designation to see what appears.
The first duplicated file is (1). You’ll want to type into the Finder search box “(1)” to populate a list of copies.
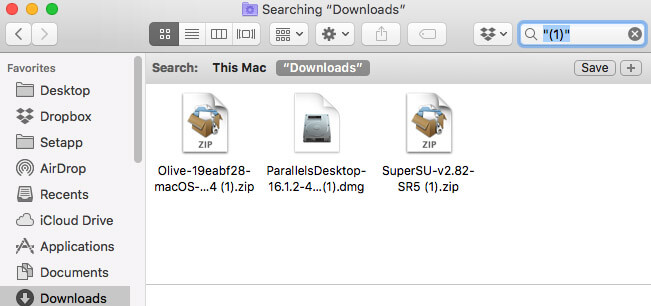
Once you get everything listed, you can pick and choose the files you want to keep.
If you don’t want to try the manual process, Disk Drill and other file location apps can let you discover and remove duplicates. After scanning your folders or an entire drive, you can quickly remove the items you don’t need to keep.

| Pros: | Cons: |
|
|
Usage:
- Download, install, and launch Disk Drill for Mac.

- Select Find Duplicates in the left panel.
- Drag folders to be searched for duplicate files.
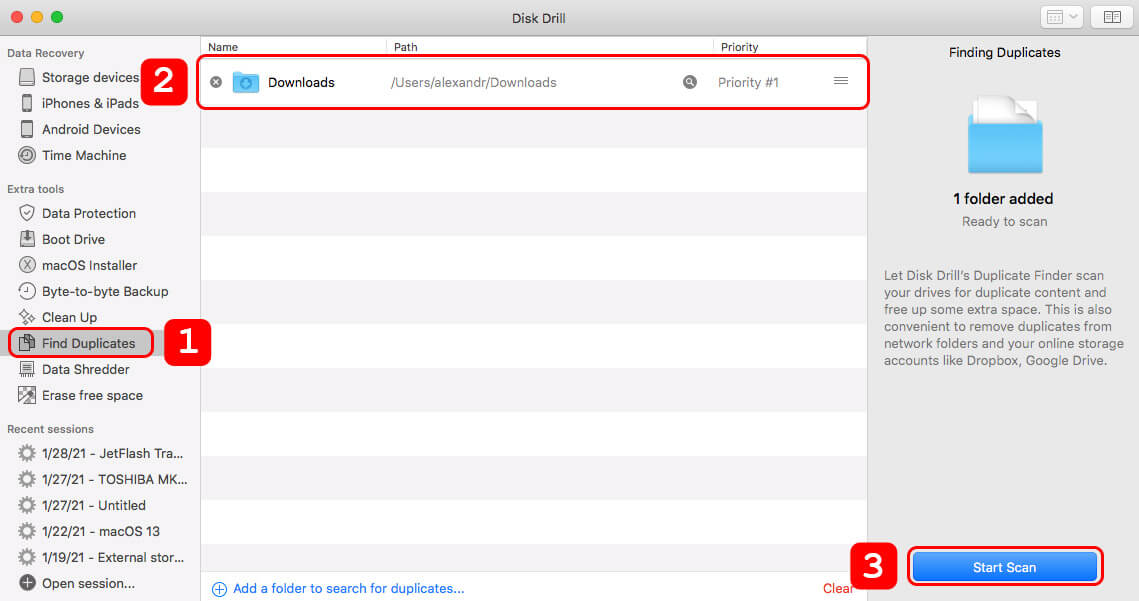
- Review the results and delete extra file copies to save space on your Mac.


4. Empty Trash Automatically
You can tell your Mac to automatically erase whatever items go to the Trash folder every 30 days. It doesn’t take long for those files to add up, and this management option because a real space saver when you don’t have much room left.

| Pros: | Cons: |
|
|
Usage:
- Open the Storage Management Window.
- Click the Empty Trash Automatically button.


5. Reduce Clutter
Your MacBook or iMac can get cluttered with a bunch of useless files quickly. If you haven’t taken the time to get organized, try going through your documents and downloads to see what files you need to keep.
Even if they aren’t duplicated, anything that is over 12 months old deserves a review. If you don’t need it, get rid of it. Send the items to the Trash folder.

| Pros: | Cons: |
|
|
Usage:
- Open the Storage Management Window.
- Click the Reduce Clutter button.

- Review the files and move those you no longer need to the Trash.

6. Remove the iTunes Backups
Unless you have slow Internet services and no access to 4G data, it doesn’t make sense to store all of your iTunes files locally. These resources can take up 100 GB or more, depending on your purchasing history.
You can delete the backup file from your Mac’s application folder through the following pathway.
~/Library/Application Support/MobileSync/Backup
The file names might look strange, but you won’t need to worry about them if they’re deleted. You can pick and choose or remove everything to save space.

| Pros: | Cons: |
|
|
7. Delete Temporary Files
Mac computers create temporary files to make your browsing life better. When you need to save some space, they should disappear. You can use file management services to clear these files easily.
If you want to do it manually, go to Finder. You can highlight the files that don’t need to be there and send them to the Trash folder.
When you need to empty caches, you can activate the Develop menu option to select that command.

| Pros: | Cons: |
|
|
8. Clear Logs, Caches, and Unnecessary Data
You can remove your caches and logs without touching all of your temporary files if you prefer to have some cookies around.
It helps to back up these files before taking this step to reduce the risk of functionality loss.

| Pros: | Cons: |
|
|
Usage:
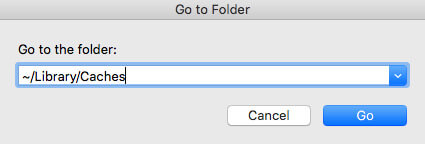
- Open Finder and select Go and then Go to Folder.
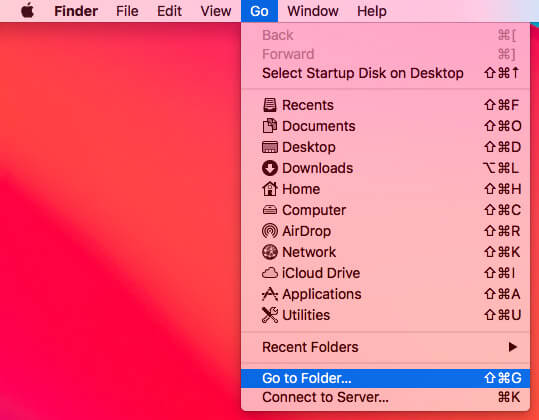
- Type ~/library/caches and then Go.
- Select the caches you want to delete. Right-click on them and send them to the Trash.


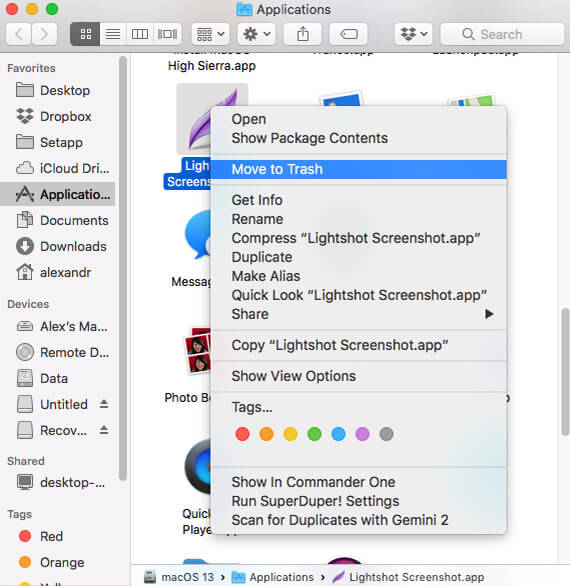
9. Remove Unused App Installers
You can uninstall applications in macOS to save a lot of space and CPU resources. This process is as easy as dragging an unwanted application to the Trash folder.
If you go to Launchpad, you can use the long-click method to pull up the wiggling icons. Click on the “X” symbol that appears by the app you want to remove. Choose “delete” to get rid of the application.

| Pros: | Cons: |
|
|
Usage:
- Open Finder and navigate to the Applications folder.
- Right-click on your selection and choose Move to Trash.

10. Detect Duplicate Safari Downloads
This option lets you authorize Safari to create numbered duplicates when you download the same thing through the browser. When you take this step, it’s much easier to find the files because you can search for the extension.

| Pros: | Cons: |
|
|
Usage:
- Open a Finder window and navigate to Downloads.
- Sort by filename and remove the duplicate files.
11. Delete Old Fonts, Dictionaries, and Languages
If you use Microsoft Word, you can delete the fonts, languages, and dictionaries you don’t use to free up more space. The exact process for this technique is found here.
Depending on what Word version you use, some fonts shouldn’t be disabled.

| Pros: | Cons: |
|
|
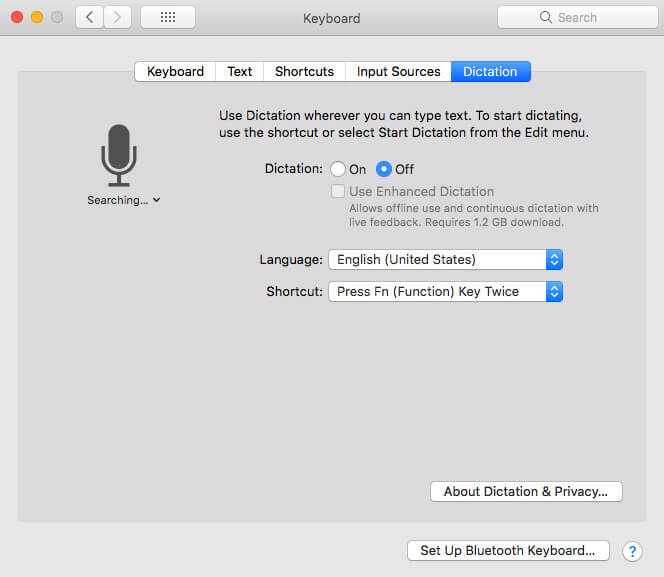
12. Remove the Dictation Libraries
If you downloaded a dictation library to help with content composition, blog writing, or general Mac management, you could remove around 1 GB of data for each one you eliminate. Although you’ll lose offline support, the online version works with minimal lag.

| Pros: | Cons: |
|
|
Usage:
- Open System Preferences > Keyboard > Dictation
- Disable Enhanced Dictation.
- From Finder, use the Go to Folder command and enter the following path:
/System/Library/Speech/Recognizers/SpeechRecognitionCoreLanguages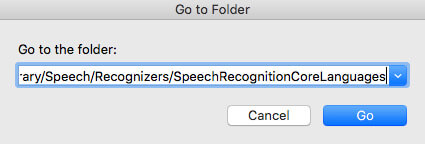
- Press Go. In the folder, select the languages that you want to remove and drag them to the Trash.


13. Clean Up the Downloads
Your Downloads folder probably has 3-5 years old files that haven’t been touched in forever. Instead of keeping these items, get rid of them!
The fastest way to accomplish this cleanup process is to open Finder. Click on the Downloads option, and then sort by the date modified.
Once you see the oldest files, get rid of the biggest ones you don’t think you’ll need.

| Pros: | Cons: |
|
|
Usage:
- Open a Finder window and navigate to Downloads.
- Sort by Date Last Opened and remove old files you no longer need.
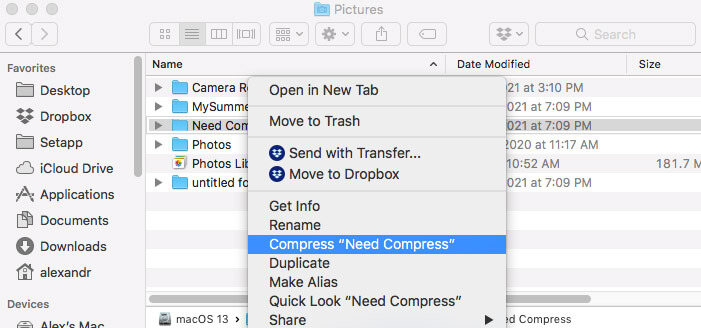
14. Compress the Files You Want to Keep
If you need to keep lots of files, the best way to save space on your Mac is to compress them into manageable folders. You can store a lot more information this way without an extensive time commitment.
- Start by creating a new folder in Finder.
- Select all of the files you want to keep in it.
- Move those files into the folder.
- Go to File in the Finder and click on “Compress.”

| Pros: | Cons: |
|
|
Usage:
- Open a Finder window and navigate to the file or folder you want to compress.
- Right-click on your selection and choose Compress.

15. Use an Expansion Drive
When you need more internal space for your HDD or SSD, an external drive is a reasonable investment to consider. You can transfer documents, audio files, pictures, and more to this resource.
Although the file transfer process might be time-intensive, you’ll notice speed improvements after moving the data and restarting your Mac.
| Pros: | Cons: |
|
|
Usage:
- Connect a removable drive to your Mac.
- Manually move the files from your internal drive to the external device.
How Important Is the Free Up Storage Space Process for Your Mac?
When your Mac reaches 10% storage availability, your system will slow considerably. You’ll see the spinning rainbow wheel appear on almost every click.
You’ll also see noticeable slowing when specific folders start containing multiple files to process. If you condense your documents and downloads into folders or delete items you no longer need, it will create more free storage space for your MacBook Air, MacBook Pro, or iMac to use.
These steps work for HDD and SSD systems, although the most profound results happen when taking these steps with a physical drive.
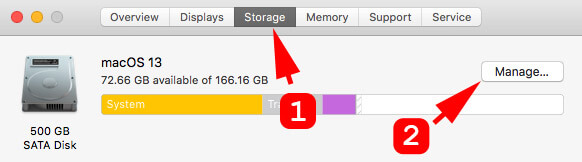
How to Check Your Mac’s Available Storage
The fastest way to see how much storage currently remains on your Mac’s drive(s) is to follow this sequence.
- Choose the Apple menu.
- Select About This Mac.
- Click on the Storage option from the available choices.
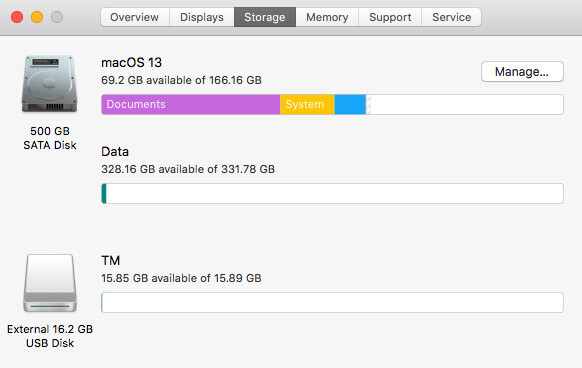
You’ll see a pop-up window appear that shows you the current status of the drive. It states the original capacity, how much space is remaining, and breaks down the various file types that take up room.
If your Mac uses most of its storage resources, it might take 1-2 minutes for this information to appear.
When you are near the 90% threshold, click the Manage button to evaluate your file management options.
Final Verdict: Free Up Storage Space on Mac
If your Mac has become lethargic, it’s time to start freeing up some space. These techniques can help you accomplish that goal with a few clicks.
Don’t worry if your MacBook Air, MacBook Pro, or iMac is initially slow to respond. You’re creating a snowball effect for your computer’s speed! As you manage the files more effectively, you’ll begin to notice the outcomes developing.
FAQ: How to Clear Up Space on Mac
The best way to free up system storage on Mac is to get organized. Apple provides several utilities that can help you with this process. You can also use a third-party solution like Disk Drill to maximize your computer’s performance.
System storage becomes high on Mac computers because too much information is stored on the drive. You’ll need to transfer those files to iCloud, delete unnecessary items, or use an external drive to make more space.
You can also compress file groups and folders to make it easier to manage your files.
Yes – but carefully. If you delete them all without an appropriate backup, this action could affect system stability. You’ll want to create a boot disk or have an iCloud restoration ready to go if the results don’t come out as expected.
The easiest way to create more storage is to delete files that you no longer need. If you don’t want to eliminate this data, use the macOS compression feature through Finder to create more space.
- Delete large messages or attachments.
- Empty your Trash folder.
- Reduce the time that message copies remain on your POP server.
Your macOS operating system requires some space resources to ensure your computer functions correctly. You’ll also see documents, photos, videos, and music taking up space. If you only have 256 GB SSD to use, it doesn’t take long until everything fills up.
Mac computers slow down because they get bogged down by files. Although some apps might cause slowing because of low memory availability, most users see speed reductions because they have used most of the space on their internal drives.
You can hunt down duplicate files and unnecessary items manually to create more space. You might find it easier to use a freemium disk space organizing solution to help you manage your data more efficiently.
If you don’t mind investing a little more, comprehensive solutions like Disk Drill provide a one-stop resource for information management.