How to Recover Deleted Photos on Mac
Table of Contents
Losing photos on Mac can happen to anyone and there are several reasons for this. It could be a malware attack, a corrupted file, an accidental deletion, or hard drive damage. While this is a common scenario for Mac users, methods on how to recover deleted photos on Mac may be unfamiliar.
This article will serve as your guide on the different methods to help solve your problem.
Let’s jump right in.
Can You Retrieve Deleted Photos on Mac?
Generally speaking, it is possible to recover deleted photos on Mac using several methods as long as the file has not been overwritten.
When a photo gets deleted, it does not get removed immediately from the system. It is still stored somewhere on the hard drive. If you regularly do backups, then restoring the deleted photos should be easy for you.
Main Methods to Recover Deleted Photos on Mac:
Method 1. Retrieve Deleted Photos from Mac Trash
The easiest way to recover a deleted photo is by accessing your Trash bin. When you delete a photo, this is where it is immediately sent and where you will be given the option to put the photo back. Unless, of course, it’s been a while since you’ve lost the file and you’ve already emptied Trash. Or if you’ve set the settings to “Remove items from the Trash after 30 days”.
Still, it doesn’t hurt to try. To do an Apple photo recovery using Trash, just do the following steps:
- Launch Trash from your dock by clicking the Trash bin icon.
- Your deleted files will be displayed inside. You can sort them by name, date modified, or kind. This will make it easier for you to look for the file that you need.
- Once you find the file, right-click it and then select Put Back. You can also drag the file to your desktop or to a new folder if that’s easier for you.
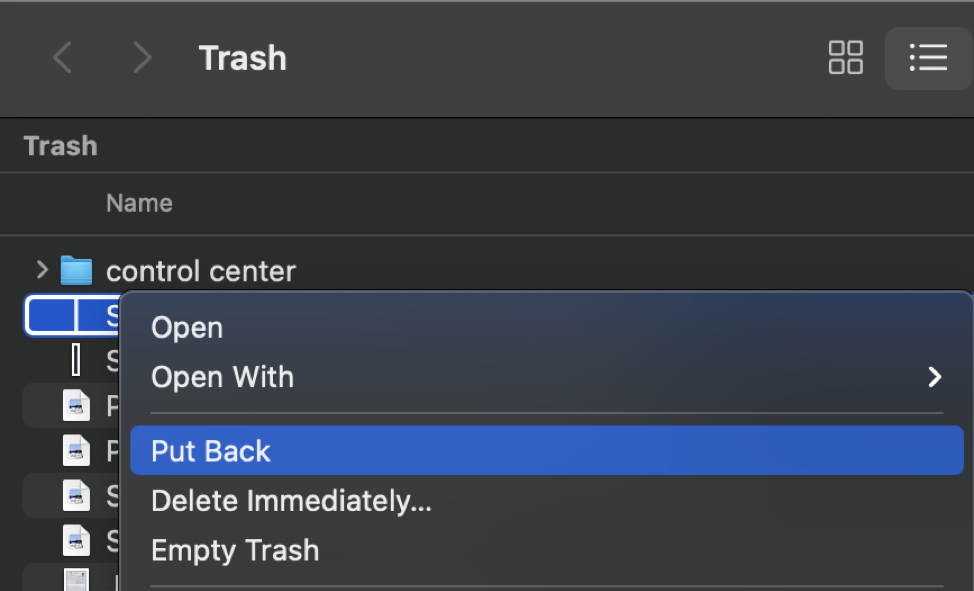
- If you select “Put Back”, the file will be brought back to its original folder location.
Method 2. Recovering Photos Using the Recents Folder
The Recents folder of Mac is a smart folder that collects your recently modified or opened files. So, if you accidentally deleted a photo that you recently modified, there’s a big chance that you can still access it on Mac’s Recents folder.
To recover a photo from the Recents folder, you have to make use of the Undo command. Note that you can only use this command a limited number of times and only on the most recently deleted files.
To Undo while in the Recents folder, you can do either of the following to restore the deleted file to both the Recents folder and its original folder:
- Go to the top bar and select Edit > Undo Move of [file name].
- Use the keyboard shortcut Command + Z.
If the undo option doesn’t work, you can still try to recover your deleted photo from the Recents folder. Here’s how:
- First, click Finder on the dock, and then select Recents from the left-side panel.
- From the options bar, go to Edit, and select Undo Move of [file name].

- Alternatively, you can also use the keyboard shortcut Command + Z.
- Once done, the retrieved file will be brought back to its original location.
Method 3. Recover Photos With Data Recovery Software
If you want to recover permanently deleted photos on Mac, an external data recovery software will help you do this. There are several options available on the internet, but Disk Drill stands out in particular.
Disk Drill has a high recovery rate and is very easy to use. The interface is beginner-friendly and the recovery process is quick. Aside from data recovery, it also has other features that help protect your drive from future damage.
Here are the steps to recover your photos with Disk Drill:
- Download Disk Drill from their official website.

- Once the download is done, install Disk Drill on your computer. Drag the Disk Drill icon to the Applications folder and launch Disk Drill from there.
- Before you can fully launch the app, a prompt will appear asking you if you are sure about opening Disk Drill. Click Open to confirm.
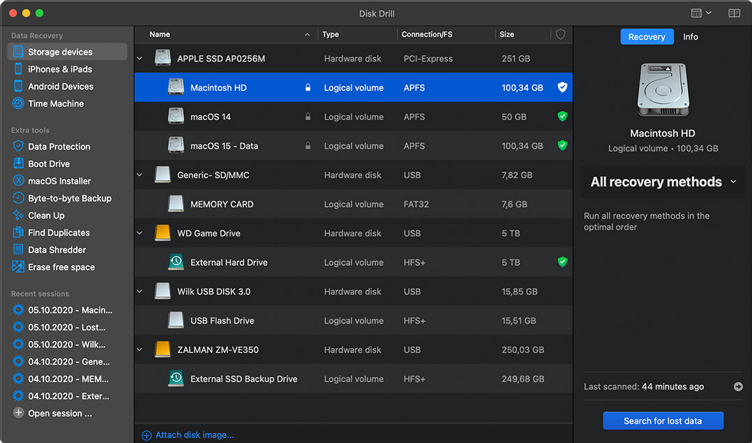
- From the homepage of Disk Drill, the available drives for scanning will be displayed. Select the disc that you want to scan, then click Search for lost data on the lower right part of the window.
- Disk Drill will now scan the drive. This will take a while depending on the size of the drive.
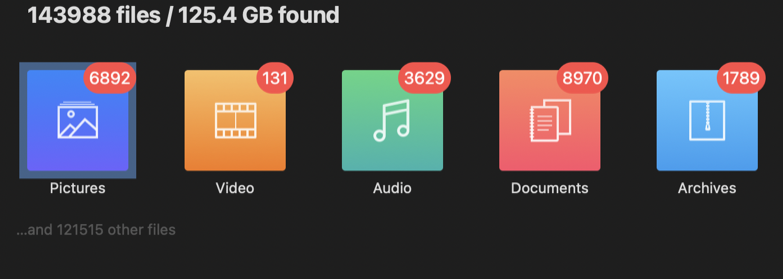
- After the scan, Disk Drill will show the items that you can recover. These are separated according to file type. Click Pictures since we are recovering photos.
- All recoverable images will be displayed. Once you’ve found the right file, click on it to see a preview of the image.
- Lastly, click the Restore button on the lower-right part of the screen, and select a folder where you want to save your restored file.
- “Data recovery complete” will show up on the screen as a confirmation that the file has been successfully recovered.
Easy, right? If you want to know more about Disk Drill’s features and capabilities, feel free to visit their official website.
Method 4. Recover from iCloud
iCloud is Apple’s cloud storage service where you can automatically backup your files as long as your iCloud account is synced with your Apple device.
Some Apple users are not aware of iCloud’s full capabilities, but you can actually recover deleted files from there. You just need to access your account via iCloud.com.
To start your Mac photo recovery using iCloud, follow the steps below:
- Begin by opening a browser and going to iCloud.com. Log in to your iCloud account. This is the same as your Apple ID.
- From the homepage of iCloud, click your username on the top-right. To access iCloud Settings, select Account Settings.

- Scroll down to find the Advanced section and select Restore Files.

- iCloud will search for all the files that you can restore.
- Any files that were deleted in the last 30 days will be displayed on the screen with the following data available:
the file name
date of deletion
the number of days left before the file will be permanently removed from iCloud - To restore a photo, select the checkbox next to it, then click Restore.
- Once the file restoration has been completed, click Done to exit.
Method 5. Recover From a Local Backup
Regularly backing up your files using Mac’s very own Time Machine can save you the hassle of using third-party apps to recover your files. With Time Machine, backups are automatically made on an hourly, weekly, or monthly basis. Just remember that the older backups will be deleted when the disk becomes full in order to make way for newer backups.
So, if you’re in the habit of backing up your files using Mac’s Time Machine, here’s what to do for your apple photo recovery:
- First, if you are using an external hard drive as a backup, connect it to your Mac. If not, skip this step and proceed to number two.
- Launch Time Machine using the menu bar or the Spotlight search bar.
- The Time Machine window will appear. Scroll to find the missing file that you want to retrieve.
- Press the spacebar on your keyboard to preview the files so you can make sure you’re retrieving the right one.
- Once you’re sure of the file that you’ve chosen, click the Restore button.
- Exit Time Machine and you’re done! The file will be brought back to its original location.
How to Avoid Photo Loss on Mac
When you lose a file, it’s usually by accident. When we are in this situation, we can’t help but panic or feel frustrated. We’ve all been there. So, here a few tips or good practices to help avoid photo loss on Mac:
- 💻 Regularly scan your device for possible threats that can lead to corrupted files
- 💡 Keep your device safe at all times and properly organize your files
- 💾 Regularly backup your files
- 💽 Always safely eject an external hard drive from your Mac before removing it
Conclusion
Even if data loss is inevitable, Apple and other data recovery software have made it easier and possible for us to recover deleted files. From using Mac’s very own built-in tools to third-party software, you need only a bit of patience and technical know-how to bring your deleted photo back.
We hope the methods we discussed can help you successfully recover deleted photos on your Mac.
FAQ
To recover permanently deleted pictures from your Mac, you need help from a data recovery software tool like Disk Drill. Just download the software from their official website and install it on your computer. Then, start the recovery process from there.
iCloud can only restore photos that were deleted within 30 days. If the file has been deleted for more than 30 days, try to use other methods such as iTunes backup or Time Machine backup.
If you regularly do backups, you can recover permanently deleted photos from Mac by using Time Machine. Launch the app on your Mac, scan through the backed-up files, and click Restore.
Another option is to recover deleted photos from iPhoto or Photos. For the older iPhoto app, simply scan it for lost files then click Recover. For the newer Photos app, go to the Recently Deleted folder, then restore the photo that you need from there.
Permanently deleted photos are still stored somewhere on your hard drive until your Mac overwrites them with new data. This is why, if you want to recover deleted photos, you should do it as quickly as possible before they are permanently deleted from your hard drive.