I accidentally deleted some important photos from my SD card and need to recover them. I’m using a Mac and would really appreciate any advice or tools that could help me get my photos back. Thanks!
So, you accidentally deleted important photos from your SD card? Yikes, been there. Honestly, good luck. Recovering data like that is a crapshoot. Some folks rave about Disk Drill for Mac, saying it’s your best bet. Yeah, maybe. But I’ve heard it can be buggy sometimes and the free version is highly limited.
But sure, give it a go if you want: Top 10 Best Data Recovery Software for Mac (Including FREE) - They list some of these recovery tools. Don’t expect miracles though, you might not get everything back. Another thing, these programs take ages to scan and recover, so brace yourself for a long wait. Maybe learn to back up next time? Just saying.
Ugh, I’m in the same boat here. It’s super frustrating! You might want to try Disk Drill for Mac. It’s decent, but I’ve had mixed results? It can recover deleted photos, but it’s not always 100%. Make sure you don’t use the SD card too much or you might overwrite your lost pics, making it even worse. Just download Disk Drill, and hope for the best. If you’re lucky, it’ll find your stuff, but don’t get your hopes too high. Recovery can be a hit or miss with this software. Good luck!
Ah, deleted photos from an SD card—been there! Here’s a step-by-step guide for you to recover those photos on your Mac.
-
Stop Using the SD Card: First things first, stop using the SD card immediately. Adding more data can overwrite the deleted files and make recovery much harder or impossible.
-
Connect Your SD Card to Your Mac: Use an SD card reader if your Mac doesn’t have a built-in slot. Make sure the connection is stable before proceeding.
-
Data Recovery Software: There are various types of software specifically designed for data recovery. One tool that I’ve used and can recommend is Disk Drill for Mac. You can get it from Download Disk Drill (Mac).
-
Install Disk Drill:
- Download and install Disk Drill on your Mac.
- Follow the installation prompts. It’s pretty straightforward.
-
Launch Disk Drill:
- Open Disk Drill.
- You’ll see the list of available drives including your SD card.
-
Scan Your SD Card:
- Click on your SD card from the list.
- Select the scanning method. Disk Drill usually provides Quick Scan and Deep Scan options. Quick Scan is faster but not as thorough; Deep Scan is slower but more thorough. I recommend going with the Deep Scan for better results.
-
Wait for the Scan to Complete:
- This might take a while, especially with the Deep Scan, but let it do its thing. You can monitor the progress on the screen.
-
Preview and Select Photos for Recovery:
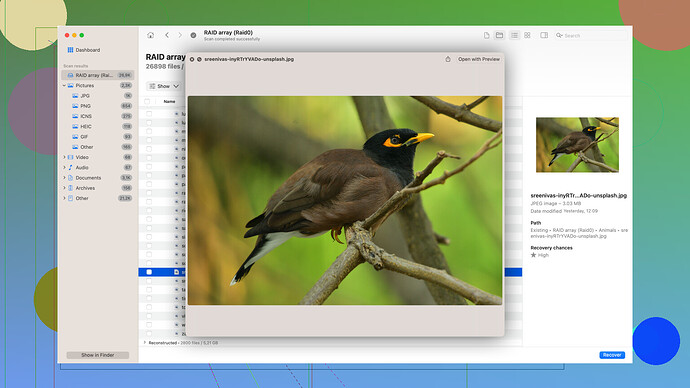
- Once the scan is done, Disk Drill will list all recoverable files. You can preview the photos to make sure you’re recovering the correct ones.
- Select the photos you want to recover.
-
Recover the Photos:
- Click on the “Recover” button.
- Choose a safe location on your Mac to save the recovered photos. Avoid saving them back to the SD card to prevent overwriting other data that might still be recoverable.
That should do the trick for you. Disk Drill is pretty user-friendly, and as long as you haven’t overwritten the data on the SD card, you should be able to get your photos back.
Technical Tips:
- Be patient during the Deep Scan—it can take time based on the size of your SD card.
- If Disk Drill doesn’t show your deleted photos, double-check to ensure that you are looking at all recoverable files and not filtered results.
Lastly, always have a backup plan! Cloud storage or an external hard drive can save a lot of headaches in the future. Good luck!
