WiFi Heatmaps: Everything You Need to Know
Table of Contents
How great would it be to enjoy the same strong WiFi coverage in every part of your home? WiFi heatmaps can help you achieve this goal, and we explain everything you need to know about them in this article.
After you’re done reading it, you’ll be ready to create your first WiFi heatmap and use it to achieve satisfactory WiFi signal strength so that you can browse the internet, stream high-definition content, or video chat with friends and family without any limitations.
Why Do You Need to Create a WiFi Heatmap?
Humans have been creating maps ever since we realized that the rock we live on stretches way beyond the closest hill or river. Today, there are not many uncharted territories left to map, except for WiFi networks and the signal landscapes created by them.
Regardless of if you live in a large house or a small apartment, you rely on a WiFi network to wirelessly connect your laptop, smartphone, tablet, and all kinds of smart devices to the internet. Ideally, you want to create a single WiFi network that covers your entire home and allows you to roam from room to room without having to constantly disconnect and reconnect.
That may sound simple in theory, but experience tells us that it’s anything but that. The problem is that there are many factors that affect how a WiFi signal propagates from the transmitter to the receiver, including interference caused by other nearby networks, all kinds of physical obstacles, and even some electronic appliances and devices, such as microwave ovens, wireless security cameras, or cordless phones.
Because of these and other factors, WiFi deployments are somewhat unpredictable and don’t always deliver the desired results. That’s where WiFi heatmaps come in, giving you the information you need to reach your goal and achieve flawless coverage and the best speeds possible in every single room.
How to Create a WiFi Heatmap for Network Analysis with NetSpot?
NetSpot makes it very easy to create a WiFi heatmap, and the entire process comes down to just a few simple steps that won’t take you more than 30 minutes to complete.
1. Install NetSpot on Your Laptop
To start with, you need to download NetSpot from its official website and install it on your laptop. The free version of this WiFi mapper for Mac supports the creation of professional WiFi site surveys, network planning, and troubleshooting. To unlock all features, you need to upgrade to NetSpot Home or PRO. There’s also an Enterprise option for up to 10 users.

2. Launch NetSpot and Create a New WiFi Heat map
With NetSpot installed on your Mac, you can go ahead and launch it just like you would any other app. You then need to switch to Survey mode and start a new WiFi survey. NetSpot will ask you to give the survey a name and specify its area type.

Before you can click Continue, you also need to create a map for your survey project. NetSpot gives you several options on how to do that. If you already have a map of your house or apartment saved on your computer, you can simply load it from the file. If you don’t have one, you can also start with a blank/sample map or use the built-in map editor to create one from scratch.
3. Begin the WiFi Mapping Process
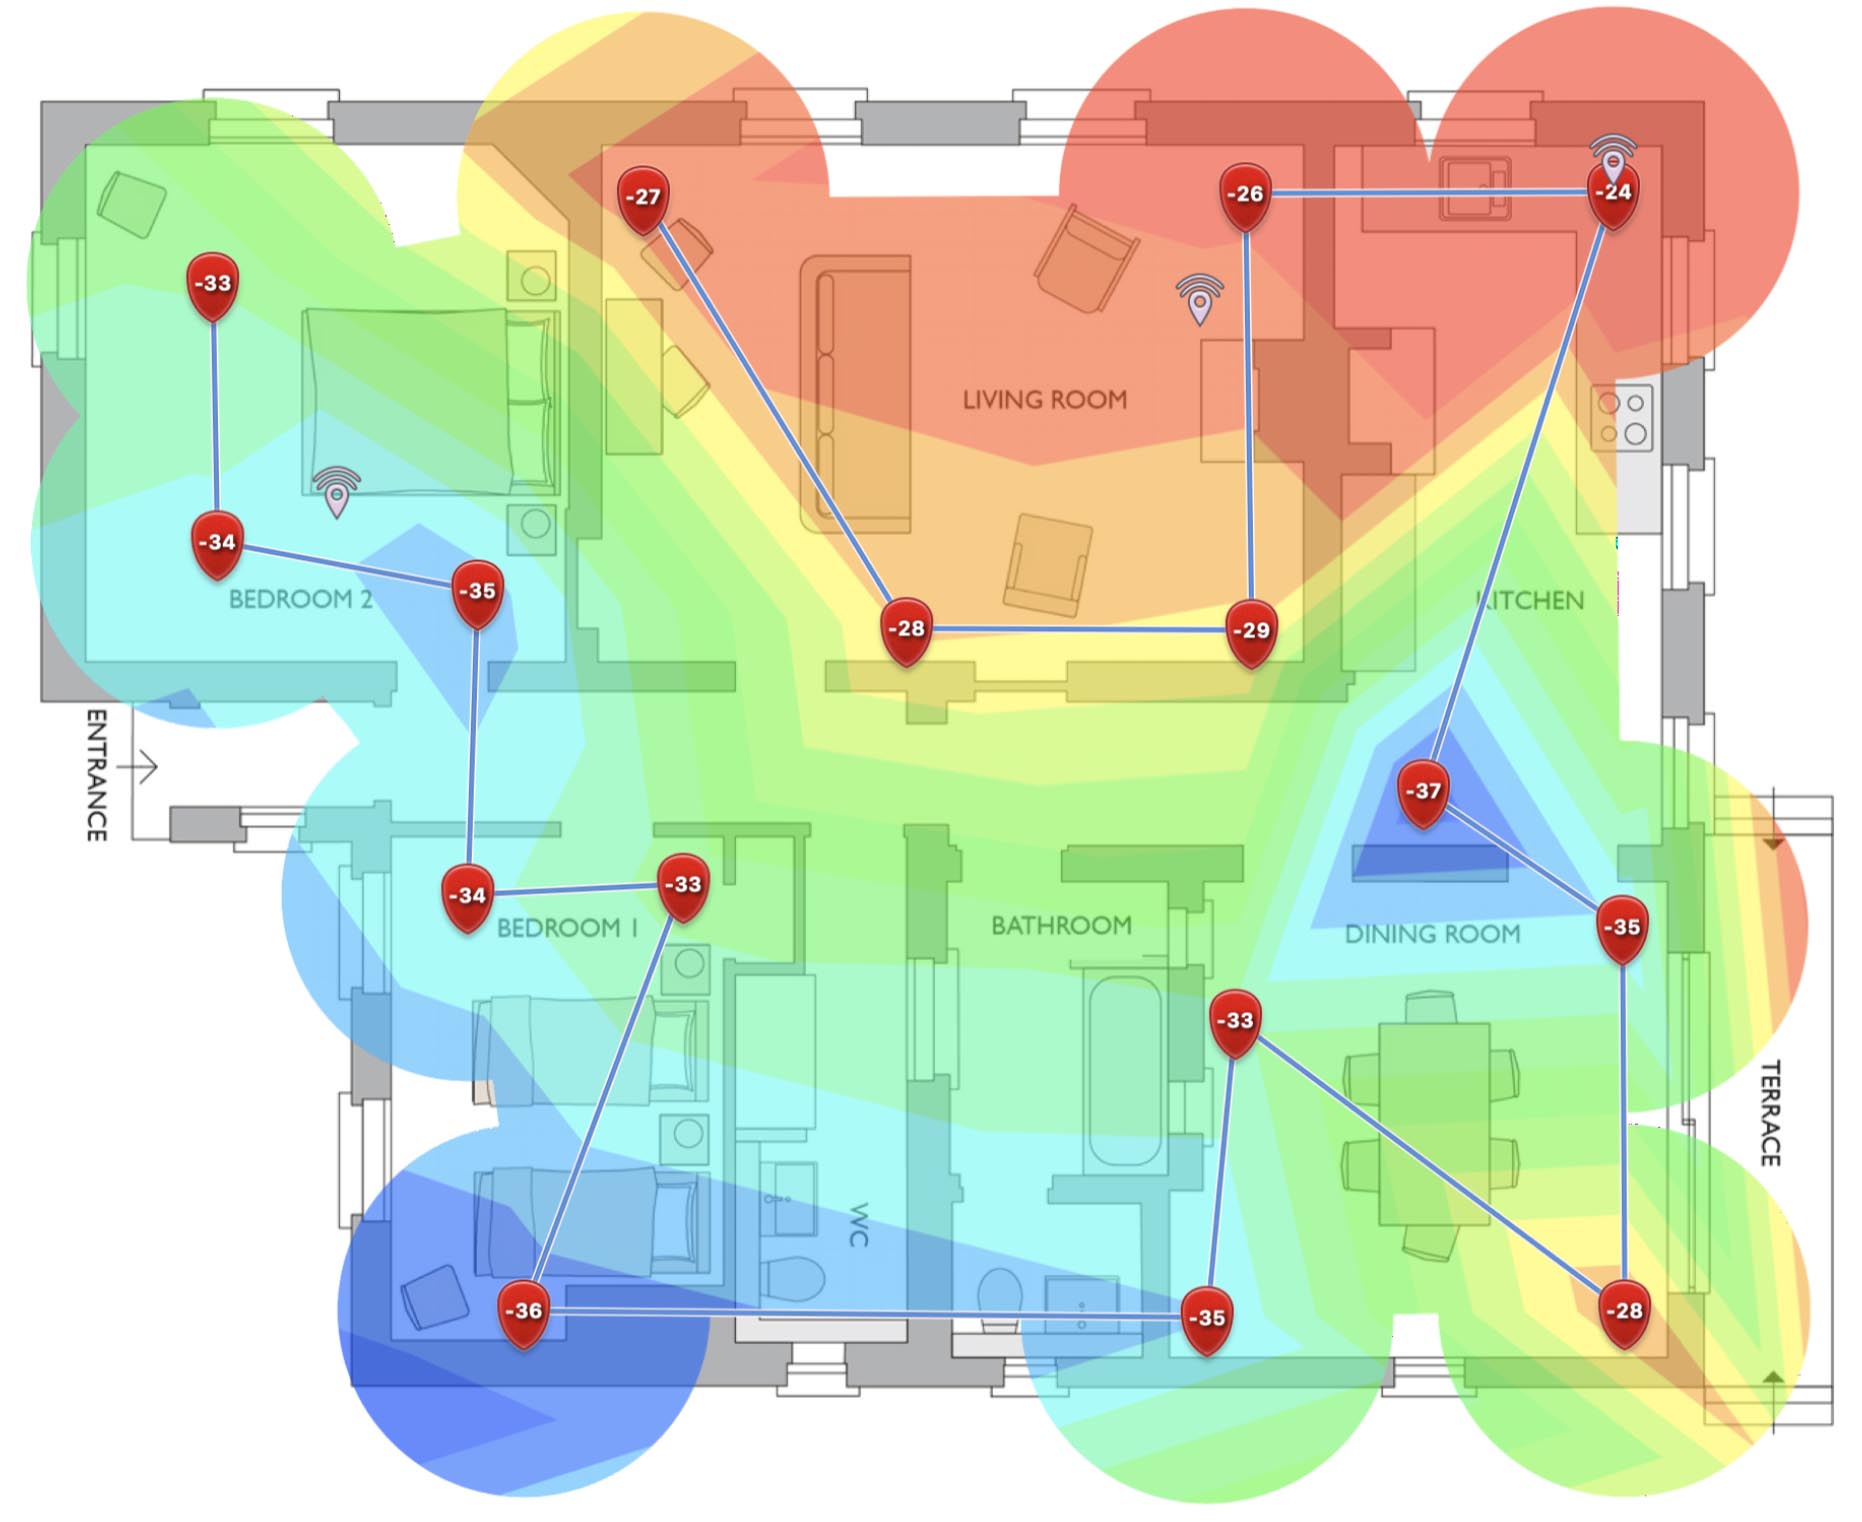
Creating the WiFi heatmap itself is a straightforward process. You simply need to carry your laptop from room to room and take measurements at regular intervals until the entire living area is mapped.

Whenever you take a measurement, NetSpot marks its location with a red marker and displays a green circle around it to indicate the area that has been measured. To obtain the most accurate results possible, you should try to make the green circles overlap slightly.
4. Analyze the WiFi Heatmap
Finally, you need to click the STOP SCAN button and analyze the created WiFi heatmap. NetSpot can transform the gathered information into over a dozen different heatmaps to give you a comprehensive overview of your WiFi network and its performance.

Here are some visualizations that are available in the latest version of NetSpot:
- Signal-to-noise ratio: compares the level of WiFi signal to the background noise level.
- Signal level: displays the strength of your WiFi signal.
- Frequency band coverage: allows quick visual analysis on different frequencies.
- Noise level: shows the amount of outside interference measured at each point.
- High level of noise: highlights areas with too much background noise.
- Wireless transmit rate: shows the speed of data transfer from an AP to a wireless device.
- Overlapping channels (SIR): shows you where there are overlapping channels.
Some of these visualizations are available only in the Mac version of NetSpot, and you can learn more about them here.
What Is Needed to Create a WiFi Heat map?
The good news is that you don’t need any expensive equipment to create a WiFi heatmap. Here’s everything you need:
- 💻 A laptop with WiFi connectivity
- ⚙️ WiFi heatmap software
If you’re a desktop user and don’t have a laptop, then you can borrow one from a friend, and you can then analyze the results on your desktop computer. The reason why you need a laptop is that creating a WiFi heatmap requires you to move from room to room, and you can’t easily do that with a desktop computer.
When it comes to WiFi heatmap software, there are many solutions you can choose from. One popular WiFi heatmap Mac software application is NetSpot, and it runs on any MacBook with macOS 10.10 or newer.
What’s great about NetSpot is that you can use it to scan any 802.11a/b/g/n/ac network, both in the 2.4 GHz and 5 GHz bands, with just a few simple clicks—no expert knowledge required (more about that later in this article). In addition to its WiFi mapping capabilities, NetSpot also shines as a WiFi analyzer, making it easy to collect all important information about nearby WiFi networks.
Fixing WiFi Performance Issues Using the Heatmap
Now that you have created a detailed WiFi heatmap, you can use it to determine the best possible solution to fix your WiFi performance issues. Here are some common fixes you may want to try:
- Find a better place for your router: Router placement is an important factor that can greatly influence how far your router can broadcast a strong WiFi signal. If your WiFi heatmap is telling you that there’s strong coverage only in one half of your house or apartment, then you should move your router to a more central location.
- Switch to a less cluttered channel: There are only 11 channels in the 2.4 GHz band, so interference caused by other routers broadcasting on the same or adjacent channels is a common occurrence. To fix it, switch to the least cluttered non-overlapping channel (1, 6, 11) you can find.
- Extend your WiFi network: Not all WiFi routers can reliably cover a large apartment or even house with a strong WiFi signal. The good news is that you can always extend the reach of your router by purchasing a WiFi extender or booster. Alternatively, you can replace your router with a mesh WiFi system.
Hopefully, the WiFi mapping techniques described in this article can help you eliminate all dead zones and avoid the problems associated with them.